File Menu
Create New Project… – Select this option to create a new project. The folder for the project should exist before you create the project. Ideally, you should have the drawing files for the project on your system when you create the project. That’s not required but there isn’t much you can do with a project that has no drawings.
When you press this button, a standard Windows Folder Selection dialog will appear. Select the project folder and press OK. The Project Properties Window will then appear, allowing you to define the properties for the project.
Open – Open a drawing file. This is typically used to open a file that isn’t part of a project, but it can be used to open a project drawing. If you are working within a project, it’s much easier to open drawings using the Project Toolbar
Save – Save the information for the current drawing as part of a project. This is only needed when you are working on a drawing outside of a project. When you work on a project drawing, your work is saved automatically.
When you select the menu option, the Drawing Properties Window is displayed. Complete the information in this window (including assigning it to a project) and press OK. All subsequent changes to the drawing will be saved automatically.
Save as TIFF file – Save the current page of the current drawing file as a TIFF formatted file. When you select the menu option, a standard Windows File Dialog will be displayed allowing you to specify the name and folder for the new TIFF file. The existing drawing file will not be changed or deleted. The new TIFF file will not be part of the current project.
This option is not available if the current file is a protected PDF file.
Convert to TIFF file – Convert the current drawing file to a TIFF formatted file. The current file will not be deleted but it’s extension will be changed by adding “cvt”. This prevents the file from being accidentally re-added to the project during a scan. A new TIFF file will be created with the same folder and filename but with the extension “.tif”. The drawing and all related information (scales, measurements, etc.) will remain part of the project but will be associated will the new TIFF file.
This option is not available if the drawing is a protected PDF file or if the drawing has multiple pages or if the drawing has been rotated and has scales or measurements.
Generate Grid Drawing – Generate a grid drawing that can be printed then used in the field to make sketches. The sketch can then be scanned and used in Dimension to generate takeoff quantities. When this option is selected, the Grid Drawing Generation Window will be displayed to enter the grid generation parameters.
Download Multiple Drawings – When you are viewing drawings from an integrated planroom, this option allows you to download multiple drawings in the background (instead of downloading them as they are viewed). When you select this option the first time, it starts a three step process:
- The Download Project Wizard is displayed to create a new project and/or define the subfolder usage for the download.
- The Download Drawing Selection Window is displayed to select the drawings to be downloaded.
- The Main Download Window is displayed to show and change the status of drawings being downloaded.
If this option was selected previously, the first two steps will be skipped.
Project List Window… – Display the Project List Window. It displays a list of all projects. You can delete projects, backup projects and set various project properties.
Project Backup… – Dimension keeps all project and drawing information in a single database. Sometimes you want to extract the information for a single project and save it. You can later restore the project information to re-create the project in your system or on another system.
When you select this menu option, a standard Windows File Dialog is displayed, allowing you to define the folder and file where you want to store the project information. Specify the file/folder information and press the “Save” button. The project information will be backed up to the specified file.
Warning: Backing up the project information saves all the project information stored in Dimension but it does NOT save the drawing files. At the completion of the backup, a hint window is optionally displayed.
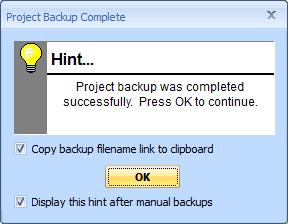
Figure 1: The Backup Completion Hint Window
The window includes a checkbox to copy a backup file link to the clipboard. This is useful when backup a project to a common server then sending an email to a co-worker who will use the backup file. If you check the box, the link will be copied when you close the hint window. When editing the email, just paste the link into the email body.
If you un-check the box “Display this hint after manual backups”, the hint window will not be displayed in the future. You can turn it back on using the “Hint” tab of the User Preferences.
This capability is not available in the Basic Viewer.
Project Restore… – Project Files are created using either the “File/Project Backup…” or “File/Project Backup and Zip…” option of the Main Menu. The “Backup and Zip” option includes the project information plus drawings in a single “zipped” file. You can re-create a project by restoring from the previously generated file. For more information, see Project Backup.
Project Backup and Zip… – This option can be used to quickly save or transfer project information, plus the drawing files. The process creates a single file with both the project information and the drawings. The file uses a standard compression format that’s also used by WinZip © and other compression utilities. You don’t need a utility program because Dimension will extract the drawing information and the drawing files. For more information see The Project Backup and Zip Wizard.
This capability is not available in the Basic Viewer.
At the completion of the backup, a hint window is optionally displayed as explained above.
Drawing List Window… – Display the Drawing List Window. It displays a list of all drawings. You can delete drawings and set various drawing properties.
Import and Rename Drawings… – When this option is selected, the Drawing Import Output Folder/Project Selection Window will be displayed to start the import process. This overall process is described in the Drawing Import Overview.
Import from Zip File… – Select this option to import drawing files from a zip file and add them to the current project. When this option is selected, a Standard Windows Folder Selection dialog will appear. Select the zip file and press OK and the Zip Import Window will be displayed to complete the import.
Purge Unused Drawings… – Purge unused drawings from a project. When this option is selected, the Purge Unused Drawings Wizard will be displayed to filter, select then purge unused drawings.
Print… – Select this menu option to print a drawing. When you select it, the Print Drawing Dialog is displayed. Complete the information in this window and press OK to print part or all of the drawing.
Batch Print – Select this menu option to display a submenu of batch printing commands. The submenu options will be disabled in the Basic version.
- Add Current Drawing to Queue – The drawing currently displayed in the main window is added to the print queue.
- Add Drawings via List – The Batch Printing Drawing Selection Window is displayed. You can select drawings to be added to the print queue.
- Edit Default Printer Configuration – The Batch Printing Printer Configuration Window is displayed and can be edited. This is the printer configuration assigned to drawings as they are added to the queue.
- Print Drawings in Queue – When you start the application, the actually printing process is suspended. This allows you to review the queue before any drawings are printed. Select this option to start printing. Once Printing is started, you can suspend it using this same menu selection.
- Edit/Review Printing Queue – The Batch Printing Status Window is displayed. You can use this window to review the status of background printing and edit the queue.
For more information on batch printing, see the Batch Printing Overview.
Print Setup… – Select this menu option to select a printer and/or change the setup of the printer. When you select it, a Windows Printer Setup Dialog will be displayed. The operation of the dialog will depend on your windows version and the selected printer.
Exit – Select this menu option to exit the application. You will be prompted to complete any actions and save any changes.
Recent Projects – Select this menu option to display a submenu of the most recently opened projects. You can click on any project to open it.
Edit Menu
Undo – Select this menu option to undo the last action. Dimension only supports Undo when adding or changing measurements and annotations.
Cut – Select this menu option to delete selected text and place it on the clipboard.
Copy – Select this menu option to copy information to the clipboard. When you are editing text, the currently selected text will be copied to the clipboard. If you are working on a measurement (and not editing text), the quantity for the measurement will be copied to the clipboard as text. which quantity to use (count, length, perimeter or area) is defined in the trace information for the measurement.
Paste – Select this menu option to paste the text on the clipboard into the text you are editing.
Copy View to Clipboard – Select this menu option to copy the current view in the main window to the clipboard. It will be copied as a bitmap. You can then switch to another application (such as email or word processing) and paste the view into a document.
View Menu
Main Toolbar – Select this menu option to show or hide the Main Toolbar . This menu option will be checked if the toolbar is currently shown.
Project Toolbar – Select this menu option to show or hide the Project Toolbar . This menu option will be checked if the project toolbar is currently shown.
Measurement Toolbar – Select this menu option to show or hide the Measurement Toolbar. The Measurement Toolbar is used to create measurements and change the characteristics of measurements.
Annotation Toolbar – Select this menu option to show or hide the Annotation Toolbar. The Annotation Toolbar is used to create annotations and change the characteristics of annotations.
This capability is not available in the Basic Viewer.
Quantity Worksheet Toolbar – Select this menu option to show or hide the Quantity Worksheet Toolbar. The Quantity Worksheet Toolbar is used to assign measurements and annotations to the Quantity Worksheet .
This capability is not available in the Basic, Pro, Pro-Plus or Advanced Viewer.
Pattern Search Toolbar – Select this menu option to show or hide the Pattern Search Toolbar. The Pattern Search Toolbar is used to control the pattern search capabilities described in the Pattern Search Overview.
This capability is not available in the Basic Viewer.
Status Bar – Select this menu option to show or hide the Status Bar. This menu option will be checked if the status bar is currently shown.
Control Panel – Select this menu option to show or hide the Control Panel . This menu option will be checked if the control panel is currently shown.
Measurement List Window – Select this menu option to show or hide the Measurement List Window. The Measurement List Window provides a list of all measurements in the current project. This menu option will be checked when the window is showing
Quantity Worksheet Window – Select this menu option to show or hide the Quantity Worksheet Window. The Quantity Worksheet Window is used to organize measurements and annotations and transfer them to other applications. This menu option will be checked when the window is showing
Issue List Window – Select this menu option to show or hide the Issue List Window. The Issue List Window provides a list of all issues in the current project. This menu option will be checked when the window is showing
Open Extra Drawing Window – Select this menu option to open an Extra Drawing Window. This allows multiple drawings to be displayed simultaneously.
This capability is not available in the Basic Viewer.
Bird’s Eye Window – Select this menu option to display the Bird’s Eye Window This window shows the entire drawing and highlights the area currently displayed. You can scroll the drawing by clicking and or dragging in the window
Show/Hide the Drawing Legend – The Drawing Legend displays a grid of all traces used in the drawing. There are columns for the trace graphic, trace description, total quantity for all measurements using the trace and unit of measure. For more information see Drawing Legend Overview.
Drawing Menu
Rotate – Select this menu option to change the rotation of the current page of the drawing. A submenu will be displayed with rotation options of 0, 90, 180 and 270 degrees. The current page rotation option will be checked. Select any option to change the rotation.
Note: Page rotation is stored in the project database and shared by all users who share project information. If you change the rotation, all other users subsequently opening that page will use the same rotation
Rotate Drawing – Select this menu option to change the rotation of the drawing. A submenu will be displayed with rotation options of 0, 90, 180 and 270 degrees. The current rotation option will be checked. Select any option to change the rotation.
If there are multiple pages in the drawing file, you will be asked “Override rotations for previously viewed pages?” If you select Yes, the rotation will be set for all pages. If you select No, only the current page and any pages not previous viewed will be rotated.
Note: Drawing rotation is stored in the project database and shared by all users who share project information. If you change the rotation, all other users subsequently opening that drawing will use the same rotation
Rotate ALL Drawings in Project – This option is in the sub-menu displayed when you select “Rotate Drawing”. Select this menu option to change the rotation of ALL drawings in the project. A submenu will be displayed with rotation options of 0, 90, 180 and 270 degrees. Select any option to change the rotation of ALL drawings in the current project.
Note: Drawing rotation is stored in the project database and shared by all users who share project information. If you change the rotation, all other users subsequently opening any of the project drawings will use the same rotation
Rename Drawing/Page… – Select this menu option to rename the current drawing or page. If the drawing is part of a single-page file, the drawing description will be changed (not the filename). If the drawing is part of a multi-page file, the description for the current page will be changed. For more information see The Drawing/Page Rename Window. This can also be invoked by pressing the F2 key.
Image Enhancement… – Select this menu option to change the image display characteristics. When you select it, the Image Enhancement Window will be displayed. This window allows you to set the way the image is displayed.
Zoom Full Size – Select this menu option to view the entire drawing.
Zoom In – Select this menu option to zoom in on the drawing (see more detail). Each time you select this option, the drawing is enlarged by the zoom percentage. The zoom percentage can be set using the User Preferences Window.
Zoom Out – Select this menu option to zoom out on the drawing (see less detail but more of the drawing). Each time you select the menu option, the drawing is reduced by the zoom percentage. The zoom percentage can be set using the User Preferences Window. This button will be disabled when the drawing is viewed at full size.
Zoom Rectangle – Select this menu option to zoom in on a particular area of the drawing. After selecting it, click-down on one corner of the area, drag the mouse to the opposite corner and release the button. As you drag, a rectangle will be displayed to show the zoom rectangle.
Compare to New Drawing… – Select this menu option to create, select, hide or delete a comparison between the current drawing an another newer drawing. When you select it, the Drawing Comparison List or Properties Window will be displayed.
Drawing Dimensions… – Select this menu option to display the dimensions for the current drawing. When you select it, the Drawing Dimensions Window will be displayed.
Pattern Search… – Select this menu option to begin searching for a pattern. For more information, see the Pattern Search Overview.
Options Menu
Set Drawing Scale – Select this menu option to set or change the scale for the drawing. When you select it, the Drawing Scale Window will be displayed.
Note: You can scroll and zoom the drawing while the scale windows are displayed.
Set Detail Scales – Select this menu option to add, change or delete detail scales for the drawing. When you select it, the Detail Scale List Window will be displayed.
Note: You can scroll and zoom the drawing while the scale windows are displayed.
This capability is not available in the Basic Viewer.
Edit Standard Scales… – Select this menu option to add, change or delete standard scales. When you select it, the Standard Scale List Window will be displayed.
Edit Standard Traces… – Select this menu option to add, change or delete standard traces. When you select it, either the Standard Trace List Windowor the Standard Trace Tree Window will be displayed depending on the “Organize Traces in a Tree” setting in the “General” tab of the User Preferences Window.
This capability is not available in the Basic Viewer.
Edit Standard Bid Codes… – Select this menu option to add, change or delete standard bid codes. When you select it, the Standard Bid Code List Window will be displayed.
This capability is not available in the Basic Viewer.
Edit Standard Extensions… – Select this menu option to add, change or delete standard extensions. When you select it, the Standard Extension List Window will be displayed.
This capability is not available in the Basic Viewer. In the Pro and Advanced viewers, extensions are an Add-on.
Edit Standard Layers… – Select this menu option to add, change or delete layers. When you select it, the Layer List Window will be displayed. The shortcut key for this menu option is Ctrl/L.
This capability is not available in the Basic Viewer.
Edit Point Symbols… – Select this menu option to add, change or delete point symbols. When you select it, the Point Symbol List Window will be displayed.
This capability is not available in the Basic Viewer.
Edit Work Breakdown Categories… – Select this menu option to add, change or delete work breakdown categories. Once work breakdown categories are defined, then work breakdown values can be set for each measurement for each category. For more information see the Work Breakdown Overview. When you select this, the Work Breakdown Category List Window will be displayed.
This capability is not available in the Basic Viewer.
Edit Import Name Mappings… – Select this menu option to add, change or delete the name mappings used in drawing import. When you select it, the Name Mapping List Window will be displayed.
This capability is not available in the Basic Viewer.
Edit Import Text Substitution… – Select this menu option to add, change or delete the text substitutions used in drawing import. When you select it, the Import Text Substitution Window will be displayed.
This capability is not available in the Basic Viewer.
Export Standards… – Select this menu option to export selected standards (scales, traces, bid codes, extensions and layers). When you select it, the Standards Export Window will be displayed.
Import Standards… – Select this menu option to import selected standards (scales, traces, bid codes, extensions and layers). When you select it, the Standards Import Window will be displayed.
Edit Item Breakdown Structure – Select this menu option to define or modify the item breakdown structure. This structure defines the hierarchy of the Quantity Worksheet. When you select this menu option, the Item Breakdown Structure Window will be displayed.
This capability is not available in the Basic Viewer.
Copy/Drag Excel Links – When this menu option is checked, quantities copied to the clipboard or dragged and dropped from the main window will be Excel links. The links are formulas provided by the Dimension Excel Add-on that dynamically provide the measurements value. So if the measurement changes, the Excel value will reflect that change the next time the spreadsheet is opened or refreshed.
This capability is not available in the Basic Viewer. The Dimension Excel Add-on is included in the Premier Viewer and is available as an add-on product for the Pro and Advanced Viewers.
Admin Menu
Set User ID – Select this menu option to set or change your user ID. In a multi-user environment, the user ID is used to keep separate project-specific preferences for each user. These preferences include the last drawing viewed for the each project, the last view used for each drawing in the project, etc. When you select this option, the User ID Window will be displayed.
Set User Preferences – Select this menu option to change your user preferences. User preferences include scrolling and selection parameters, close-up window operation, etc. When you select this menu option, the User Preferences Window will be displayed.
Install Software License… – Select this menu option to set, change or review your Dimension license information. Dimension can’t be operated with out a valid license. When you select this menu option, the Dimension License Installation Window will be displayed.
Install Add-on License… – Select this menu option to install or review add-on licenses. It can also be used to install trial add-on licenses. Add-on licenses provide additional capabilities not included in the main license. When you select this menu option, the Dimension Add-on License Installation Window will be displayed.
Manage Concurrent Licenses… – Select this menu option to manage concurrent licenses. When you select this menu option, the Dimension Concurrent License Window will be displayed.
Network Proxy Settings… – Select this menu option to enter or edit the network proxy settings for your computer. Proxy settings are used when Dimension needs to authenticate itself in order to access the Internet. When you select this menu option, the Dimension Proxy Server Settings Windowwill be displayed.
Help Menu
Display Online Training Guide – This will display a online guide for new users to learn about the features The guide will display in an external browser window.
Dimension Help – Select this menu option to display the Dimension help information. The table of contents will be displayed on the left and the Getting Started help page on the right.
Welcome Page… – Select this option to display the welcome page shown at first run.
Join an Online Demonstration – Select this option if you are speaking with a Dimension salesperson and they ask you to join an online demonstration. Your web browser will be started and directed to a demonstration login page.
Join a Support Session – Select this option if you are speaking with a support person and they ask you to join a support session. Your web browser will be started and directed to a session login page.
Display Notification Messages… – Select this option to display the Notification Window with various messages. These could include expiring maintenance agreements or subscription billing problems as well as notices of software upgrades and/or newly published newsletters.
Check for Software Updates… – Select this option to see if you’re using the latest version of the software. If you are, you will get a simple message. If you aren’t, a notification window will be displayed describing the latest enhancements. The window also has a link you can click to install the software updates. If you click the install link, you will need to exit the application.
About Dimension – Select this menu option to display information about Dimension. When you select it, the About Dimension Import Window will be displayed.