
Project Properties Window
This window is used to enter or change the properties of a
project.
This window is invoked from the Ribbon Bar’s Home Tab
New button or
Edit button.
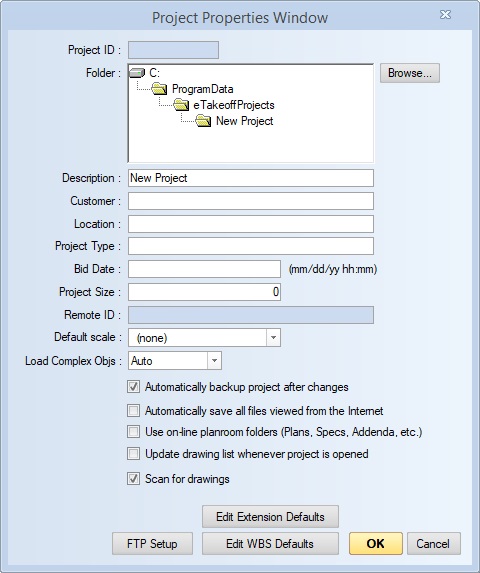
Figure 1: The Project Properties Window - New Projects
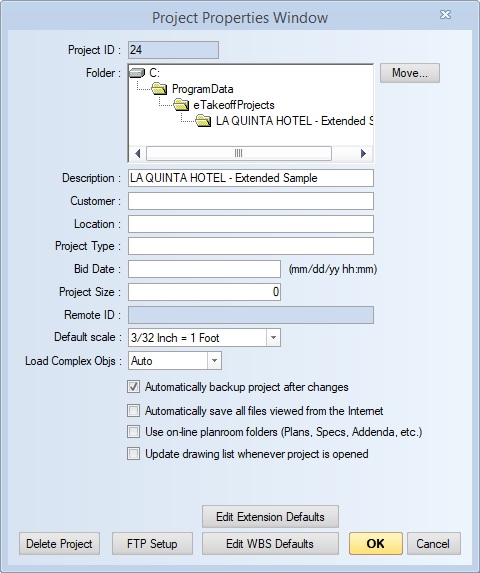
Figure 2: The Project Properties Window - Existing Projects
Project ID - The is a code used internally by Dimension to uniquely identify the project. It is displayed here in case it's needed for user support.
Folder - The is the name of the root folder for the project. Ideally, all drawings for the project are stored in this folder or one of its subfolders. This isn't required but it makes drawing scanning work better.
Move... - You can press this button to change the folder for a project. The Change Project Folder Window will be displayed to change the folder.
Description - The description of the project is used in the project list in the project toolbar to identify the project. When adding a new project to a project, the folder name (without the path or extension) is used to initialize the description.
Customer - The name of the customer for the project. Projects can be sorted by customer in the Project List Window.
Location - The geographical location of the project. Projects can be sorted by location in the Project List Window.
Project Type - The type of the project. This is typically something like "School", Office Building", etc. Projects can be sorted by type in the Project List Window.
Bid Date - The bid date and time of the project. The date can be entered as mm/dd/yy or mm-dd-yy. The time is optional. If entered, there must be a space between the date and the time. Time is entered as hh:mm where hh is the hour as 00 (midnight) to 12 (noon) to 23 (11 PM). Projects can be sorted by bid date in the Project List Window.
Project Size - The size of the project. This might be the total square feet or any other number used to evaluate the relative size of different projects. Projects can be sorted by size in the Project List Window. Size is also used when doing a Project Quantity Comparison.
Remote ID - The remote identifier for the project. If the project was generated from a remote planroom, this read-only value is the identifier used by the planroom to identify the project.
Default scale - This is default scale for the project. Click the down-arrow to select from the standard scales. If you define a default scale, you can quickly assign that scale to drawings. See Default Drawing Scale.
Load Complex Objects - This setting allows you to choose a default action for Load Complex Objects for the project.
Automatically backup projects after changes - If this is checked, any time you leave the project after making changes it will automatically be backed up.
Automatically save all files viewed from the Internet - If this is checked, any file (drawing) you view from the Internet will automatically be added to the Dimension project and the file will be stored in the project folder or one of its subfolders.
Use on-line planroom folders (Plans, Specs, Addenda, etc.) - If this is checked and files are saved from an on-line planroom, the files will be placed in a subfolder to the local project folder that matches the folder used by the on-line planroom. WARNING: Not all planrooms use subfolders and pass that information to Dimension.
Update drawing list whenever project is opened - This option only applies to projects that are connected to an FTP site or a planroom with advanced integration (Dexter & Chaney Venture or Dodge Data & Analytics). If this is checked, each time you open the project, an updated drawing list will be downloaded from the planroom or FTP site.
Scan for drawings - This checkbox will only be displayed when creating a new project. If this is checked and you press OK, Dimension will scan the project folder and all sub-folders for drawings. The drawings will be displayed in the Drawing Scan Window. In that window you can select those you want to add to the project.
Delete Project - This button will only be displayed for existing projects. Press this button to delete the current project. When you press this button, you will see a warning window:
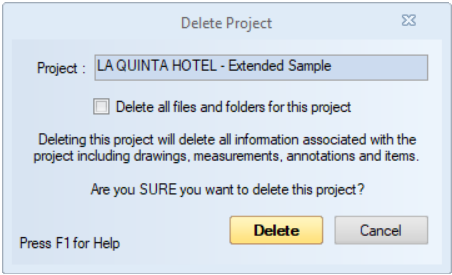
Figure 3: The Project Deletion Window
If you want all the folders and files associated with the project to be deleted, check the box "Delete all files and folders for this project". Then, press the "Delete" button if you're sure you want to delete the project.
FTP Setup - If the project will be used files that will be downloaded from an FTP site, press this button to set up the FTP information for the project. For more information see FTP Setup Window.
Edit Extension Defaults - Press this button to view or set the Extension Variable Project Defaults for the project.
Edit WBS Defaults - Press this button to view or set the Work Breakdown Defaults for the project.
OK - Press this button to complete the adding or editing of the project and return to the Main Window.
Cancel - Press this button to cancel the adding or editing of the project and return to the Main Window.