
Standard Extension Maintenance
This document describes how standard extensions are created, edited and reviewed. It assumes that you are already familiar with extensions in general. If not, we suggest you read the document Extensions Overview .
The Standard Extension List Window
The first step in editing standard extensions is to click on the Settings Tab / Edit Extensions Button . This displays the Standard Extension List Window.
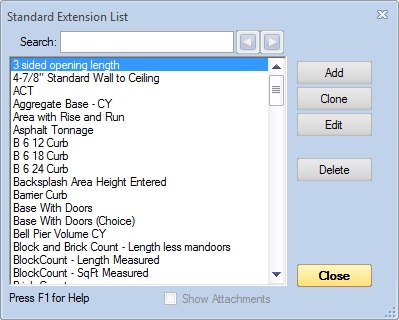
Figure 1: Standard Extension List Window
List of Standard Extensions - The upper-left corner of the window shows a list of the standard extensions. To change or delete an extension, you must first click on the extension in this list to select it.
Add - Press this button to add a new standard extension. A sub-menu will be displayed with the following options:
- Fmla - Select his option to create an extension that uses formulas. This is the most common extension type.
- Grid - Select his option to create a grid extension. Grid extensions have all the functionality of normal (formula) extensions, plus they calculate and display a grid of squares covering the measurement. For more information see Grid Extensions.
- Roll - Select his option to create a roll extension. Roll extensions have all the functionality of normal (formula) extensions, plus they calculate and display a series of rectangles showing how rolled material (such as carpet or tar paper) would cover the measurement. For more information see Roll Extensions.
In either case, the Standard Extension Edit Window will be displayed to enter the extension (see below).
Edit - To edit or review an existing standard extension select the extension in the list then press this button. The Standard Extension Edit Window will be displayed, showing the extension and its description.
Delete - To delete an existing standard extension, select the extension in the list, then press this button. You will be asked if you're sure you want to delete the extension. If you respond "Yes", the extension will be deleted.
WARNING: You cannot delete a standard extension if it is currently in use by a standard trace, a project measurement or a project quantity worksheet. When you try to delete a standard extension, Dimension will check all standard traces and all projects for usage. This may take some time.
If you later import a project that uses a deleted standard extension (or an extension not in your standards), the standard extension will be created automatically.
Searching for extension variables
In Figure 1 above, at the top of the window you will see the search controls. This can be used to search through all the extensions to find a particular variable or phrase.
Enter the desired variable name or phrase in the search edit control then press the Previous or Next button to find the previous/next extension that uses what you entered. Upper/lower case is ignored. The extension description and the name and description for each variable in the extension are searched. When a match is found, the focus is moved to that extension in the list.
The Standard Extension Edit Window
The Standard Extension Edit Window is used to create, edit or review standard extensions.
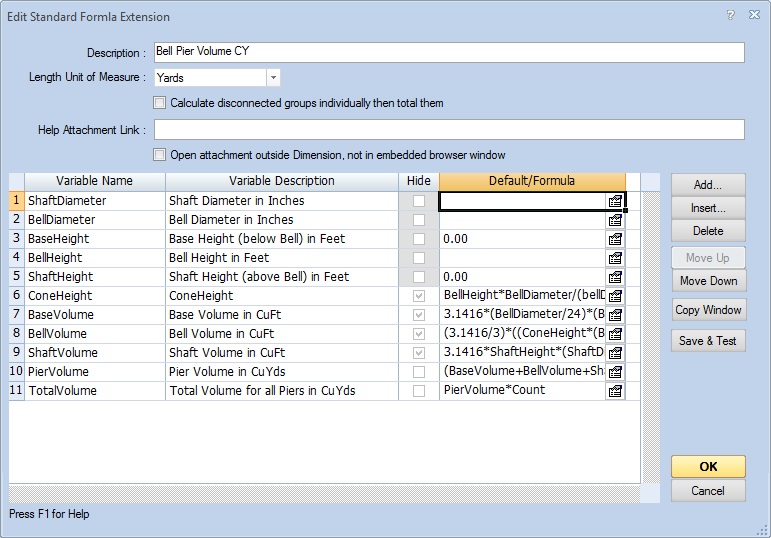
Figure 2: Standard Extension Edit Window
The "Description" field at the top of the window is the extension description. This will appear in the list from which you select a standard extension for a trace or a quantity worksheet item.
The "Length Unit of Measure" combo box allows you to select the length unit of measure you assumed when creating the extension. In the "Wall Area" example in figure 2, the assumed unit of measure is feet. If the extension is used with a drawing that has a different unit of measure (such as meters), the area, length and perimeter will be converted to the extension unit of measure before they're used in any calculation.
The checkbox "Calculate disconnected groups individually then total them" is usually NOT used. There are some cases such as calculating stud counts where it might be checked. Three walls eight feet long would require more studs than a single wall twenty-four feet long.
The "Help Attachment Link" allows you to enter a filename or web site address of information to be displayed while entering the extension values for a measurement. This works best when using a web address such as "http://www.mycompany.com/extensionhelp/WallArea.html". If a filename is used, you must be sure that the file's path is consistent across all computers using the extension.
The "Open attachment outside Dimension, not in embedded browser window" checkbox allows you to force display of the attachment in a window outside Dimension. Attachments other than web pages should ALWAYS be displayed out Dimension. If pages are displayed inside eTakeoff, Dimension can control the display to update it as the user moves the focus from measurement to measurement.
Most of the window is taken up by the extension field grid. Each row defines a field that is either entered manually or calculated based on values in the rows above it (plus area, count, length and perimeter). Each row has the following columns:
Name - This is the field's name. The name is used to refer to the field in formulas (extension formulas and quantity worksheet formulas). Field names must start with a letter or an underscore. The remaining characters can be letters, numbers or underscore.
Description - The description appears in tool tips.
Hide - If this box is checked, the field CAN'T be used in quantity worksheet formulas, as a trace data type or as a quantity worksheet data type. It WON'T be included in the measurement quantity list in the takeoff toolbar.
Default/Formula -
For numeric input fields, this is the default value.
WARNING: If you enter valid defaults for all
numeric input fields, new measurements using the
extension will NOT display the error icon.
For formula fields, enter the formula to calculate the field value. Extension formula syntax is similar to Quantity Worksheet Formula Syntax. But extension formula operands refer to measurement quantities (Area, Count, Length or Perimeter) or to preceding fields.
Properties Button - Press this button to display the properties for the field in the Extension Field Properties Window.
Note: There is a special properties window for drop-down list fields described below.
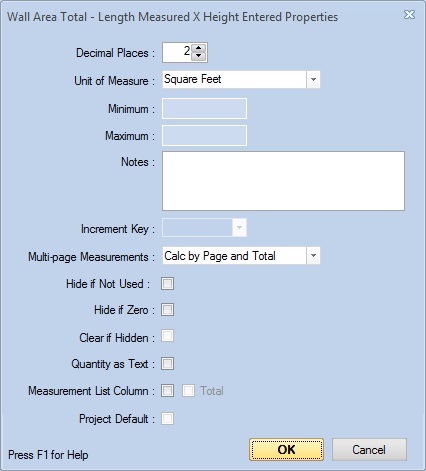
Figure 3: Standard Extension Field Properties Window
Decimal Places : - This is the number of decimal places for the computed or entered field. For numeric input fields, the number entered must not have more decimal places than this value. For calculated fields, this will define the number of decimal places used to DISPLAY the value. But the calculated value will NOT be rounded to this precision.
Unit of Measure : -
This is the unit of measure for the field. You can select
a standard unit of measure from the drop-down list
or enter a user-defined unit of measure.
WARNING: When defining a standard extension you must
make sure the formulas take into account the units of measure.
For example, if you have a numeric field "Depth" with an Inches
unit of measure, then calculate the volume in Cubic Feet, you must
include a divisor to convert inches to feet (Area*Depth/12).
Minimum : - For numeric input fields, this optional value sets the minimum value that can be entered for an actual measurement.
Maximum : - For numeric input fields, this optional value sets the maximum value that can be entered for an actual measurement.
Notes : - You can optionally enter a long description here that will be displayed as a tool tip when the mouse hovers over the variable name of value when setting the value for a measurement.
Increment Key : - For numeric input fields, this optional value allows the value to be incremented by pressing a key. For example, the number of doors could be set to a default of "0" with the "Space Key" selected for the Increment Key. While measuring the wall, the space key could be pressed each time a door is encountered to increment the number of doors from 0 to 1 then 2, etc.
Multi-page Measurements : - When the extension is used in a multi-page measurement, there are three options for how the field is entered and used:
- Enter by page and Total - The value is entered or calculated for each page, then totaled for the entire measurement.
- Enter by Page, NO Total - The value is entered or calculated for each page, but the total has no meaning and is not displayed.
- Enter once for all pages - The value is entered or calculated once for all pages.
Hide if Not Used : - If this is checked, Dimension analyzes the formulas and the existing values to determine which variables are used later in the extension. If a variable isn't used the variable will be hidden. See Hiding Extension Variables for more information.
Hide if Zero : - This checkbox is displayed only for formula variables. If this box is checked and the field evaluates to zero, the field will not appear in the drop-down or control panel quantity lists.
Hide if Variable is Zero : - This drop-down list is displayed only for input variables. It contains a list of the previous variables in the extension (plus a blank entry). If you select a previous variable and the variable is zero, unchecked or blank, this input variable will not appear in the drop-down or control panel quantity lists.
Clear if Hidden : - For input variables, this applies if "Hide if Variable is Zero" (above) has a variable selected and that variable is zero, unchecked or blank, causing the current variable to be hidden. In this case, if the box is checked, the current variable will be set to zero, unchecked or blank. If it is NOT checked, the variable will retain any default or previously entered value even though the variable is hidden.
Quantity as Text : - Most extension fields that are displayed in the Measurement List or the Quantity Worksheet are displayed as numeric values. But there are cases where alphanumeric text is needed. For example, you might want a Drop-down list of window types an display the selected type as text in the measurement list. This check box works differently for different field types:
- Numeric Input - This is unchecked and disabled.
- Check boxes - This is unchecked by default but can be checked to show Yes/No in the quantity columns.
- Drop-down lists - Unchecked by default but can be checked.
- Formulas - Unchecked by default but can be checked.
- Text Input - This is checked and disabled.
If the box is checked and the field is displayed in a quantity column, it will be displayed as left-justified text.
Note: If Quantity as Text is selected, The Multi-page Measurement setting must be "Select/Enter once for all pages". We can't sum multiple text entries.
Measurement List Column : - If this box is checked, this variable can appear as a column in the Measurement List. This is useful when the same variable is used in many extensions and/or traces. For more information see Measurement List Extension Columns.
Total - If the Measurement List Column box is checked and this box is checked, when the measurement list is sorted and totaled, a total will be displayed for this column.
Note: When you check the box for a variable, Any variable in other extensions with the same name will also become a measurement list column.
Note: Changes to the measurment list columns will not take effect until the next time the measurement list is opened.
Project Default : - In this box is checked, you can specify a project default for this variable. For more information, see the Extension Project Defaults Window.
Many different extensions may use the same varible name. But only one version of that variable can be a project default. When you check the box for the variable in one extension, the default is used for the same variable name in other extensions so long as the two variables' input characteristics are identical. That means the same decimal points, drop-down list entries, default values, minimum and maximum values, etc.
For example, if you had a numeric input named "StudSize" in one extension and a drop-down list with the same name in another extension, only one of them could be a Project Default.
If you display this same window for a variable with the same name in a different extension, the box will be disabled. It will be checked if its input characteristics are the same. If they are different, the box will be unchecked. In either case the name of the extension where the variable is set as the project default will be displayed to the right.

On the right side of the window are buttons to organize the fields in the grid:
Add - Press this button to add a new field to the end of the grid. A context menu will be displayed allowing you to select the type of field to add:
- CheckBox - Add a checkbox field. This field can be used in later formula fields. If checked it has a value of one. If unchecked, its value is zero.
- Drop-down List - Add a drop-down list field. See the section below on drop-down lists
- Formula - Add a formula field.
- Numeric Input - Add a numeric input field.
- Text Input - Add a text input field.
Insert - Press this button to insert a field in the grid before the current focus row in the grid. The same context menu described above is displayed to select the field type.
Delete -
Press this button to delete current focus row in the grid.
WARNING: This will invalidate any subsequent
formula fields that use the deleted field.
Move Up - Press this button to move the current focus row in the grid up one row (before the row that was above it).
Move Down - Press this button to move the current focus row in the grid down one row (after the row that was below it).
Copy Window - Press this button to display the Extension Copy Window
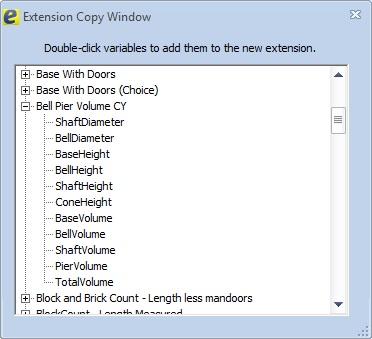
This window allows you to easily copy variables from existing extensions into extensions you are creating. Simply double-click on the desired variable and it will be added to the extension you're editing.
Save & Test - If you select a measurement before editing standard extensions, you can test the extension while you're editing it. The points of the selected measurement are copied and used to calculate the Count, Length, Area, etc. for testing. If you have selectd a measurement and press this button, the Extension Measurement Maintenance Window will be displayed for testing.
OK - Press this button to save all changes made to the Standard Extension and close the Standard Extension Edit Window. The extension will be updated (or added). When an existing extension is updated, the current project is re-calculated including the quantity worksheet. Other projects will be re-calculated the next time they are opened.
Cancel - Press this button to discard all changes made to the standard extension and close the Standard Extension Edit Window.
Drop-down List Properties Window
Drop-down list fields allow the user to select a value from a pre-defined list. For example they might select from a list of rebar sizes, steel plate thicknesses or stud lengths.
Each entry in the list has a description and a value. The description is displayed to the user in the drop-down list. The value is used in formulas. Using the steel plate thickness example, the description might be something like '3/16"' while the value might be the weight in pounds per square foot. If you want multiple values based on the selection, you can separate them with semicolons and use the SSplit function to get individual values.
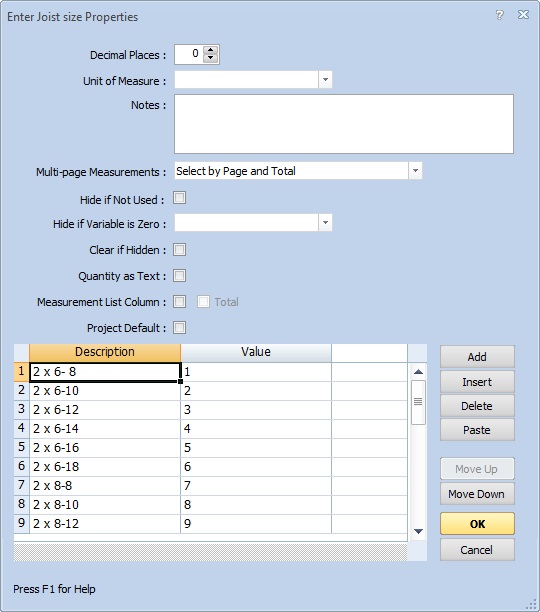
Figure 4: Drop-down List Field Properties Window
The "Decimal Places", "Unit of Measure", "Notes", "Multi-page Measurements", "Hide if Not Used", "Hide if Variable is Zero", "Clear if Hidden", "Quantity as Text", "Measurement List Column", "Total" and "Project Default" values are the same as for Formula and Numeric Input fields.
The list entries are entered in a grid similar to the grid in the extension edit window. The grid has two columns.
Description - This is the text that the user sees in the list and in the extension edit.
Value This is the value of the variable when used in a formula.
The buttons for adding, deleting and moving rows are the same as those in the extension edit window.
Add - Press this button to add a new row at the end of the list
Insert - Press this button to insert a row in the grid before the current focus row in the grid.
Delete - Press this button to delete current focus row in the grid.
Paste - Drop-down rows can be transferred from Excel® or any other application that can copy CSV data to the clipboard. The data should be in 2 columns. The first is the row description. The second is the row value. Select the two columns for the desired rows in the CSV application and copy them to the clipboard. In the Extension Drop-down List Properties Window, simply press the "Paste" button. The rows will be added to the end of the list.
Move Up - Press this button to move the current focus row in the grid up one row (before the row that was above it).
Move Down - Press this button to move the current focus row in the grid down one row (after the row that was below it).
Multiple Values in Drop-down Lists
It's sometimes useful to have the list selection determine multiple values. For example, selecting a rebar size could determine both the diameter of the rebar and the pounds per foot. This can be done by entering the values separated by semicolons, then using the Ssplit formula function to extract individual values.
Extending the rebar example above, the value would be weight;diameter. So for Rebar #5 the value would be "1.043;0.625". SSplit(Rebar,1) would return the weight. SSplit(Rebar,2) would return the diameter.