Project List Window
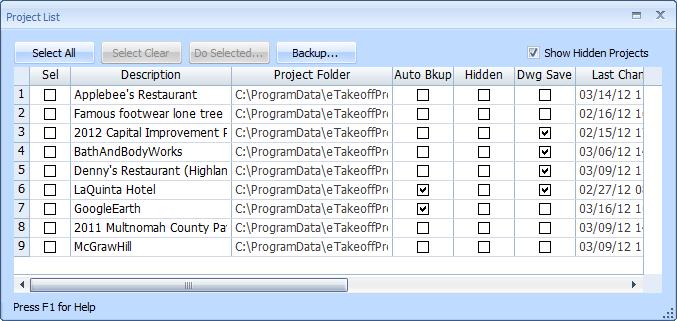
This window displays a list of all the projects currently in the viewer database. Hidden projects may be included or excluded by checking or un-checking the "Show Hidden Projects" button described below.

Figure 1: The Project List Window
Most of the window is taken up by the project list. This list shows all the projects currently in the viewer database. Above the project list is a row of buttons.
Command Buttons
- Select All - Pressing this button will select all projects. The "Sel" column shows the selection status for each project. Commands such as deleting, backing up, or checking options can be performed on all selected projects in a single step.
- Select Clear - Pressing this button will clear the selection checkbox for all projects in the list.
- Do Selected... -
Pressing this button displays a menu of commands that can be performed on the
selected projects:
- Turn Auto Backup ON - Choosing this option will turn ON Auto Backup for all selected projects. If Auto Backup is on, any time you make changes to a project (or its drawings, measurements, annotations, etc., it will be automatically backed up when you leave the project.
- Turn Auto Backup OFF - Choosing this option will turn OFF (disable) Auto Backup for all selected projects.
- Turn Dwg Save ON - Choosing this option will turn "Dwg Save" ON for all selected projects. Dwg Save is used for projects that come from an integrated planroom. When Dwg Save is on, any project drawings downloaded from the planroom for viewing are automatically saved locally and added to the project.
- Turn Dwg Save OFF - Choosing this option will turn "Dwg Save" OFF for all selected projects.
- Turn Hidden ON - Choosing this option will mark all selected projects as hidden. Hidden projects are not included in the project list or tree in the project toolbar. Hidden projects are only included in the Project List Window if the "Show Hidden Projects" checkbox is checked.
- Turn Hidden OFF - Choosing this option will mark all selected projects as NOT hidden. Hidden projects can be restored by checking the "Show Hidden Projects" checkbox so they appear in the window, then un-checking the "Hidden" checkbox for the project.
- Delete Selected Projects... -
Choosing this option will delete all selected projects.
First a message box will be displayed asking you to verify that
you really want to delete the projects. If some of the projects
to be deleted have changed since they were last backed up, you will be warned
of that too. Files and folders associated with the projects will NOT be deleted.
WARNING: When you delete a project, all information about the project is deleted from the viewer database. If you have backed up the project (to an backup file), you can re-create the project by restoring. But if you haven't, all project information is gone forever. - Backup Selected Projects... - Choosing this option starts a backup of all selected projects. A window is displayed first to select different backup options. Backing up is discussed below.
- Backup... - Pressing this button starts a backup of all projects that have changed since they were last backed up. A window is displayed first to select different backup options. Backing up is discussed below.
- Show Hidden Projects - Hidden projects are excluded from the project list and tree in the Ribbon Home Tab. If this checkbox is checked, they will be included in the project list. Hidden projects can be restored by checking this checkbox so they appear in the list, then un-checking the "Hidden" checkbox for the desired projects.
Context Menu Commands
if you right-click on a row in the project list, a list of commands is displayed. If you select a command, it will act on the project row where you clicked. The commands are:
- Backup project "[project name]" - Choosing this option starts a backup of the row project. A window is displayed first to select different backup options. Backing up is discussed below.
- Delete project "[project name]" -
Choosing this option will delete the row project.
First a message box will be displayed asking you to verify that
you wish to delete it. If you respond "Yes", the project will
be deleted.
WARNING: When you delete a project, all information about the project is deleted from the viewer database. If you have backed up the project (to a backup file), you can re-create the project by restoring. But if you haven't, all project information is gone forever. - Change folder for project "[project name]" - Select this option to change the folder for a project. The Change Project Folder Window will be displayed to change the folder.
The Project List
Columns
The project list shows a list of all the projects in the viewer database. Hidden projects may by included or excluded by checking or un-checking the "Show Hidden Projects" button described above.
At the top of the list are the column headings. The columns are highly configurable:
- You can change the width of a column by dragging the line at the end of the column heading.
- You can delete a column by right-clicking on the column heading and selecting "Delete" from the context menu.
- You can insert a column by right-clicking on the column heading, selecting "Insert column" from the context menu and selecting the desired column from the list.
- You can add columns to the end of the list by right-clicking the square area above the vertical scroll bar. Select "Add column" from the context menu, then select the desired column from the list.
- Once you have the columns configured for a particular purpose, you can save that configuration and re-load it latter.
The following columns are available:
- Sel - Check this box to add the project to the "select projects". You can press the "Do Selected..." button to perform various actions on the selected projects.
- Auto Bkup - This is the Auto Backup checkbox. If Auto Backup is on for a project, any time you make changes to the project (or its drawings, measurements, annotations, etc., it will be automatically backed up when you leave the project.
- Bid Date - This column optionally contains the bid date (and time) for the project. This can be edited directly. The date is entered as "mm/dd/yy" or "mm-dd-yy". The time can be optionally added. Enter a space after the date then enter the time in "hh:mm" format where hh is 00 to 23 (00 is midnight,
- Customer - This column optionally contains the customer name. It can be edited directly.
- Description - The project's description is displayed in this column. It can be edited directly in the list.
- Dwg Save - Dwg Save is used for projects that come from an integrated planroom. When Dwg Save is checked for a project, any project drawings downloaded from the planroom for viewing are automatically saved locally and added to the project.
- Hidden - Checking this box will mark all the project as hidden. Hidden projects are not included in the project list or tree in the project toolbar. Hidden projects are only included in the Project List Window if the "Show Hidden Projects" checkbox is checked.
- Last Auto Backup - This is the date and time the project was last automatically backed up.
- Last Change - This is the date and time the project was last changed. Adding, deleting or changing a measurement, annotation, drawing, issue, quantity worksheet item or any other information associated with the project will reset the change date.
- Last Man Backup - This is the date and time the project was last manually backed up. Manual backups are done via the backup options in the Ribbon Bar File Menu.
- Last Opened - This is the date and time the project was last opened from the drop-down project list or tree in the project toolbar.
- Location - This column optionally contains the project location. It can be edited directly.
- Plan Source - This column optionally contains the source of the project plans. It can be edited directly. For plans that come from a planroom, this will be initially set to the name of the planroom.
- Project Folder - This is the project folder for the project. By default, project drawings are stored in the project folder or one of its subfolders.
- Project ID - This is an identifier assigned to the project when it was created. Project numbers are assigned sequentially so you can sort by this column to see project in chronological sequence.
- Project Size - This column optionally contains the project size. Size should be entered as a whole number with no commas or decimal places. It is used for Project Quantity Comparison. It can be edited directly.
- Project Type - This column optionally contains the project type. It can be edited directly.
- Scale (Default) - This is the default scale for project drawings. You will be warned before this scale is used for a new drawing.
- SubFolder -
Subfolder is used for projects that come from an integrated planroom.
When Subfolder is checked for a project, any project drawings downloaded
from the planroom for viewing and saved locally will be placed in the same
subfolder they were in on the planroom.
WARNING: Not all planrooms provide subfolder information. - Takeoff - This box will be checked if measurements or annotations exist for the project.
For the "Sel", "Auto Bkup", "Dwg Save", "Hidden" and "Subfolder" columns you can check a range of rows. Click on the checkbox of the top row in the range to put the focus on the that row. Then hold down the Shift key and click on the checkbox of the bottom row of the range. All rows in the range will be checked or un-checked.
Sorting Rows
You can sort the rows by the value of a column. To sort, right-click on the heading of the desired column
Saving and Re-loading Column Configurations
You will probably want to configure the columns differently for different purposes. For example, you might have one configuration for reviewing projects by bid date and another for reviewing when projects were last opened, changed or backed up.
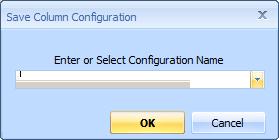
When you right-click in the column heading (any column), you will see the menu option "Save Column Configuration...". Select it and the Column Configuration Naming Window will appear.

Figure 2: The Column Configuration Naming Window
You can enter a name for the current configuration. If you wish to replace an existing configuration, you can press the down-arrow button and select from the list. Once you have entered a name, press the "OK" button and the configuration will be saved.
To re-load a saved configuration, right-click in the column heading and select "Load Column Configuration" from the menu. A sub-menu will appear listing the saved column configurations. Select a configuration and the columns will be set to match the configuration.
To delete a column configuration you no longer want, right-click in the column heading and select "Delete Column Configuration" from the menu. A sub-menu will appear listing the saved column configurations. Select a configuration and it will be deleted from the saved configurations
Resizing the Project List Window
You can change the size of the project list window by dragging the edges or corners of the window or the Resizing Control in the lower right-hand corner of the window. The list will expand or contract to adjust to the new window size. The viewer will remember the window size and re-use it as you close and re-open the window.
Backing up Projects
You can invoke project backup in three ways:
- Right-click on a project row and select "Backup project [project name]".
- Select projects to backup using the "Sel" column, press the "Do Selected..." button, and choose "Backup Selected Projects..." from the menu.
- Press the "Backup..." command button.
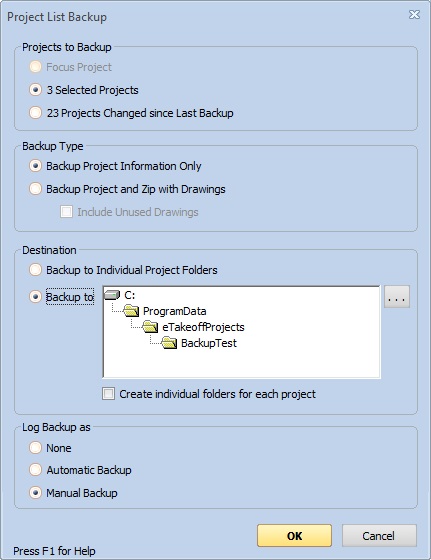
No matter how you invoke Backup, the Project List Backup Window will be displayed.

Figure 3: The Project List Backup Window
The first section of the window determines what projects are to be backed up. The default selection will depend on how you invoked backup. If you right-clicked on a project, backing up that project will be checked. If you invoked backup from the "Do Selected..." menu, backing up the selected projects will be checked. If you pressed the "Backup..." command button, backing up changed projects will be checked. You can check a different option if desired.
The second section of the window determines the type of backup to be performed. If you check "Backup Project Information Only", then only the project information will be backed up. Drawings will not be included. If you check "Backup Project and Zip with Drawings", the project information will be backed up then zipped into a single file along with the project drawings. If you check the "Include Unused Drawings" box, all drawings will be included. Otherwise only drawings with measurements or annotations will be included.
The third section of the window determines where the backup files will be placed. If you check "Backup to Individual Project Folders", each backup file will be placed in the project folder for that project. If you check "Backup to:", you can use the Dimension Folder Selection Window to select a destination folder. All backup files will be placed in that folder.
If you select "Backup to" and check the box "Create individual folders for each project", a new folder will be created under the select folder for each project. This is very useful when moving data from an old computer to a new computer. You can move the backed up projects (in individual folders) to the new computer and place them directly under the Dimension Project Folder. Then you can restore projects as they are needed.
The last section of the window determines how the backup should be logged. If "None" is checked, neither the "Last Man Backup" date or the "Last Auto Backup" date will be set for the projects. If you check "Automatic Backup", the "Last Auto Backup" date will be set for the projects. If you check "Manual Backup", the "Last Man Backup" date will be set for the projects.
Backup Filenames
The name of the backup files will depend on the backup options. The filenames are designed so that the backup of one project never overwrites the backup of another project. But the backup of a project may (intentionally) overwrite a previous backup of that project. The filename is of the form "[description]-[log name]-[project id].[extension]".
The backup filename always starts with the project description. (Characters that are not allowed in filenames are removed.) That is followed by a dash then the backup log name. If you choose to log the backup as an "Automatic Backup", the log name will be "AutoBackup". Otherwise the log name will be "ManualBackup". Next comes the project ID. This guarantees that each project will go to a different file, even if it has the same description as another project.
The extension depends on the Backup Type. If only project information is backed up, the extension will be "tpx". If the project information is zipped with drawings, the extension will be "tpxzip".
