
Trace Tree Window
Standard traces are pre-defined, commonly-used traces that can be quickly assigned to a measurement or a quantity worksheet item. When you have only a few traces, they can be quickly selected from the Trace Selection Window using a simple list. But when you have hundreds of traces, it can be useful to organize and select them using a hierarchical tree.
User Preference to Organize Traces in a Tree
Standard traces are pre-defined commonly used traces that can be quickly assigned to a measurement or a quantity worksheet item. This window can be invoked by clicking on the Settings Tab / Edit Traces button.
Organizing Traces in a Tree
The Standard Trace Tree Window will be displayed with the organizing tree on the left and the list of traces assigned to the current folder displayed on the right. Initially the only folder in the tree will be the root folder "Standard Traces".
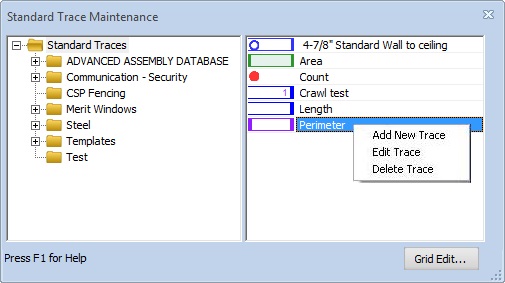
Figure 1: The Standard Trace Tree Window
Organizing Tree - The left part of the window contains the organizing tree. You can create and maintain the tree using the following context menu options:
- Add Child Folder - Right-click on the folder that will CONTAIN the new folder then select this option from the context menu. A new folder will be inserted with the name "New Folder". You can then change the folder name.
- Edit Folder Name -
Right-click on the folder you wish to rename and select this option.
You can then enter the new name. You can also rename a folder
by moving the focus to it then pressing F2.
The following rules apply to folder names:
- The root folder name ("Standard Traces") cannot be changed.
- Folder names cannot be blank.
- Folder names cannot contain the pipe character ("|").
- Each folder with a given parent must have a unique name.
- Delete Folder - Right-click on the folder you wish to delete and select this option. You will be asked if you're sure you wish to delete the folder. If you answer "yes", the folder and all its sub-folders will be deleted. Any traces assigned to those folders will be re-assigned to the parent of the deleted folder.
- Delete Folder AND ITS TRACES - Right-click on the folder you wish to delete and select this option. You will be asked if you're sure you wish to delete the folder AND ALL THE TRACES IT CONTAINS!. If you answer "yes", the folder and all its sub-folders will be deleted. Any traces assigned to those folders will be deleted.
WARNING: Folders with no traces assigned to them will be discarded when the window is closed. For new users, a hint will be displayed any time there is an empty folder
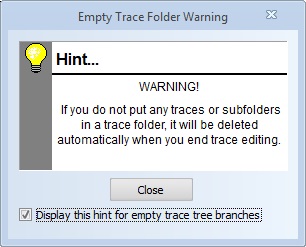
Figure 2: The Empty Trace Folder Hint Window
List of Traces - The right part of the window shows a list of the standard traces assigned to the currently selected folder in the trace tree on the left. You can create, edit or delete traces using the following context menu options:
- Add New Trace - Right-click anywhere in the list and select this option to add a new trace assigned to the current folder. The Standard Trace Edit Window will be displayed to enter the trace information. If you right-click on an existing trace, the new trace will be initialized with the values of the trace you clicked on. If you right-click where there is no trace, the new trace will initially have no point, line or fill display.
- Edit Trace - Right-click on the trace you wish to edit and select this option. The Standard Trace Edit Window will be displayed with the selected trace.
- Delete Trace - Right-click on the trace you wish to delete and select this option. The selected trace will be deleted without asking if you're sure.
Re-Assigning Traces - To move a trace from one folder to another, do the following:
- In the Tree, put the focus on the folder currently containing the trace you want to re-assign.
- If necessary, scroll the tree and open folders so the folder you want to move the trace to is visible.
- In the list, click down on the trace you want to move and drag it to the destination folder in the tree.
- Release the mouse and the trace will be moved to the destination folder.
Re-Sizing the Tree and List - You can resize the entire window by dragging one of the edges or corners. As you do, the tree and list will change size to fit the window. The list will change width while the tree width will stay the same. To change the tree width, click down between the tree and list and drag until the tree is the desired width.
Trace Grid Edit
Press the "Grid Edit..." button to edit the traces in a grid. Grid editting makes it easy to change a trace property across multiple traces. Pressing the button will display the Standard Trace Grid Edit Window.
Drag/Drop Descriptions to Create Traces
New users often need to create many new traces to match their estimating system. If they have the names of those traces in an application such as Microsoft Word, they can easily create a new trace by dragging the description and dropping it one of the traces in the list. When the drop is made, the Standard Trace Edit Window is displayed to create the new trace. Initially the new trace will have the dropped description and all the properties of the trace the description was dropped on.
Selecting Traces using a Tree
Selecting a trace for a measurement can be invoked in several ways:
- Clicking on a trace in the Traces Control in a control panel
- Choosing "Select Trace..." from the Main Window Context Menu.
- Pressing the "Browse..." button in the Trace Edit Dialog when editing a measurement trace.
You can also select a standard trace by pressing the "Browse..." button in the Trace Edit Dialog when editing a quantity worksheet item.
In all the cases above, the Standard Trace Tree Window will be displayed in selection mode.
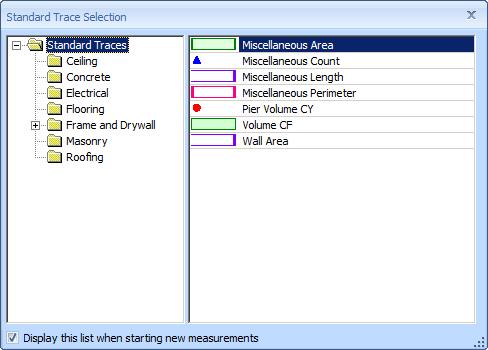
Figure 3: The Standard Trace Tree Window, Selection Mode
There are only a few differences between maintenance mode (described above) and selection mode:
- The checkbox "Display this list when starting new measurements" is shown. If you check this box, the measurement list will be displayed each time you create a new measurement.
- You cannot edit the folders or the traces. You can only select.
To select a trace, navigate to the desired folder in the tree; then double-click on the desired trace in the list.