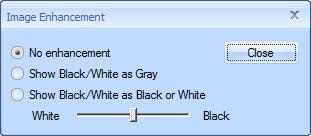
Image Enhancement Window
This window is used to enhance the display of images. When large images are displayed on a computer screen, many pixels (dots) from the drawing are represented by a single pixel on the screen. For example, an E-size drawing would by 12000 by 9000 pixels. Displayed on a 600 by 450 screen area, that means that each screen pixel would represent 400 pixels (20 by 20). There are three ways to represent the drawing pixels:
- If most of the drawing pixels are white, make the screen pixel white. If most are black, make it black. This is referred to as "No enhancement". The problem with this for drawings is that it makes thin lines disappear completely.
- Make the screen pixel a shade of gray based on the mix of black and white drawing pixels. This works better but can produce a soft or "fuzzy" appearance.
- Increase the importance of the black or white drawing pixels. For example, show a black screen pixels if 20% or more of the drawing pixels are black. This works well with many drawings because the black pixels are more important.
That's the theory. The reality is that it's simpler to just try different enhancement techniques and see which one works best. As you change the enhancement options, you will see the drawing display change immediately.
The Image Enhancement Window is invoked from the Drawing Tab / Image Enhancement button.
Note: You can zoom and scroll the drawing while the image enhancement window is displayed.

Figure 1: The Image Enhancement Window
No Enhancement - Select this option if you want the screen pixel to match the majority of the drawing pixels it represents.
Show Black/White as Gray - Select this option if you want the drawing pixels represented by a shade of gray.
Show Black/White as Black or White - Select this option to show a black or white pixel. Then move the slider bar to increase the importance of black or white.
Close - Press this button to close the image enhancement windows, using the current enhancement settings.
