
Batch Printing Printer Configuration Window
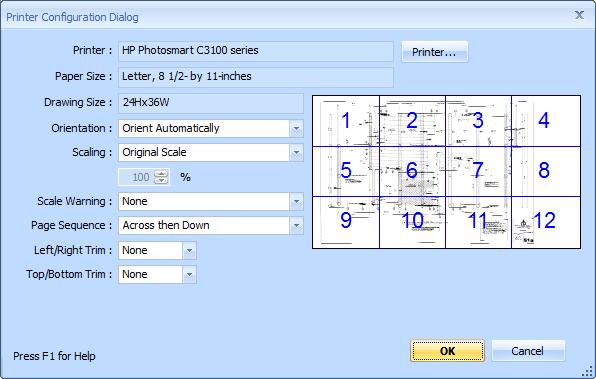
Figure 1: The Batch Printing Printer Configuration Window
This window can be invoked in a number of ways:
- Select "File/Print/Batch Printing/Edit Default Printer Configuration" from the Ribbon Bar File Menu.
- Displayed automatically when drawings are added to the print queue and no default configuration has been defined.
- Invoked from the Batch Printing Status Window to change the printer configuration for selected drawings.
The first two cases above set the Default configuration. This configuration is assigned to drawings as they are added to the queue. In the third case, the configuration is set for specific drawings.
Preview Window - This large window on the right half of the dialog shows what will be printed using different settings. Each page is numbered. If you trim the edges, that area will be grayed out and not have a number. If you are setting the Default configuration from the Main Menu, the preview window will be empty.
Printer : - This box displays the currently selected printer. Press the Printer... button to select a different printer or change the printer setup.
Paper Size : - This box displays the currently selected paper size for the printer.
Drawing Size : - This box displays size of the drawing shown in the preview window. Be aware that the drawings using the printer configuration may not all be the same size.
Orientation : - Select from the following options:
- Landscape - The drawing will be printed in Landscape mode
- Portrait - The drawing will be printed in Portrait mode
- Orient Automatically - If the drawing is wider than it is tall, it will be printed in Landscape Mode. Otherwise it will be printed in Portrait mode WARNING: If the drawing is printed across multiple priner page, this will not necessarily be the most efficient orientation.
Scaling : - Select from the following options:
- Match Original Scale - Select this option if you want the drawing printed at its original scale. The Preview Window will show the number of pages required.
- Fit To Page - Select this option if you want Dimension to scale the output to fit on a single page.
- Percent of Scale - Select this option if you want to print the drawing at a specified percentage of the original scale. Then specify the percentage in the edit control
Scaling Warning: - When a drawing is printed at a scale other than the original scale, you may want to display a warning message. You can chose one of the following:
- None - No scale warning is printed.
- Display Over Drawing - The scale warning is printed in the lower left corner, over the drawing.
- Display Below Drawing - The drawing print area is slightly reduced (1/4 inch) and the scale warning is printed in the lower left corner, below the drawing. Selecting this option may force more trimming or more pages
If a warning is printed, it will say "Printed at XX% of original size. Verify scale before use."
Page Sequence : - Select from the following options:
- Print Across, then Down - Select this option if you want the pages printed row by row. The Preview Window will show the page sequence numbers.
- Print Down, then Across - Select this option if you want the pages printed column by column. The Preview Window will show the page sequence numbers.
Trimming - In some cases, the printing options selected may result in pages along the edges that contain no useful information. The options below allow you to "Trim" those edges (not print them). The trim is set separately for horizontal and vertical trimming.
Left/Right Trim : - Select "None" to disable horizontal trimming. Select "Left" to trim the left edge of the drawing. Select "Right" to trim the right edge of the drawing. Select "Both" to split the trimmed amount between the left and right edges.
Top/Bottom Trim : - Select "None" to disable vertical trimming. Select "Top" to trim the top edge of the drawing. Select "Bottom" to trim the bottom edge of the drawing. Select "Both" to split the trimmed amount between the top and bottom edges.
OK - Press this button apply the settings to the selected drawings or the default printer configuration.
Cancel - Press this button to cancel printer configuration. If this window was invoked automatically when drawings were added to the queue, the drawings will NOT be added to the queue.
For more information on batch printing, see the Batch Printing Overview.