
Batch Printing Overview
When a project contains many drawings of the same size, batch printing can be used to print multiple drawings using the same printer configuration. The configuration can be set once then applied to numerous quickly selected drawings. This is much faster than opening drawings and printing them individually. The selected drawings are added to a queue and printed in the background
The batch printing steps can be performed in several different sequences but the most common is this:
- Set the printer configuration
- Add drawings to the queue by selecting them from a list.
- Start the background printing
- Check the status of the background printing
All these options can be selected from "File/Print/ Batch Printing" from the Ribbon Bar File Menu. There's also an option to add the current drawing to the queue.
Setting the Default Printer Configuration
When a drawing is added to the print queue, it is assigned the current default printer configuration. You can set this configuration by selecting "File/Print/Batch Printing/Edit Default Printer Configuration". If you add drawings to the queue before setting the configuration, you will be prompted to set it. You can also change the printer configuration for drawing after they are added to the queue. All these options display the Printer Configuration Window.
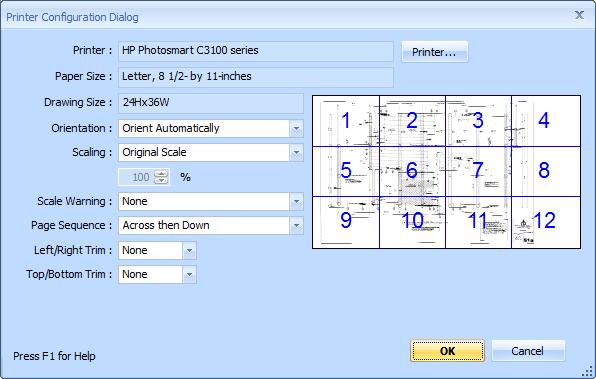
Figure 1: Batch Print Configuration Window
You can change the default configuration at any time but the default configuration will only be applied to drawings when they are added to the queue. It will not change the configuration for drawings already in the queue. For more information on the printer configuration, see the Batch Print Configuration Window.
Adding Drawings to the Queue
You can add the current drawing to the queue by selecting "File/Print/Batch Printing/Add current drawing to queue" from the Ribbon Bar File Menu. You can add multiple drawings by selecting "File/Print/Batch Printing/Add drawings via list" from the Ribbon Bar File Menu. The Batch Print Drawing Selection Window will be displayed.
If you want to select drawings from a specific subfolder, you can right-click on the subfolder in the Control Panel Drawing Tree and select "Queue member drawings for batch print..." from the context menu. The Batch Print Drawing Selection Window will be displayed containing only the drawings from the subfolder.
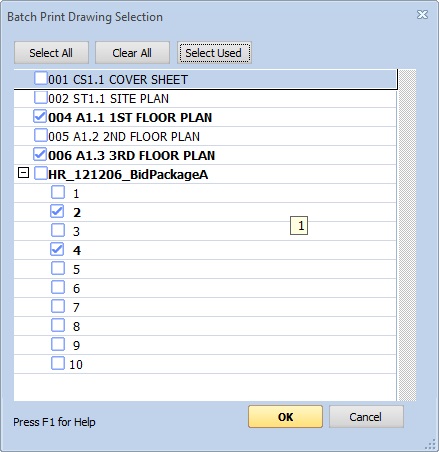
Figure 2: Batch Print Drawing Selection Window
The selection window shows a list of the files in the current project. You can select a file by checking the box next to it. For multi-page files, checking the box will cause all pages to be printed. You can click on the "+" button to display and select/deselect individual pages. When you have finished selecting, press the "OK" key to add the drawings to the print queue. For more information on the drawings selection, see the Batch Print Drawing Selection Window.
If you haven't previously set the default drawing configuration, the configuration dialog (described above) will be displayed. The default printer configuration will be applied to the selected drawings.
Start Printing
When you start the application, the actually printing process is suspended. This allows you to review the queue before any drawings are printed. To start printing, select "File/Print/Batch Printing/Print drawings in queue" from the Ribbon Bar File Menu. Once Printing is started, you can suspend it using this same menu selection.
Edit/Review the Printing Queue
At any time, you can review the queue by selecting "File/Print/Batch Printing/Print drawings in queue" from the Ribbon Bar File Menu. The Batch Printing Status Window will be displayed.
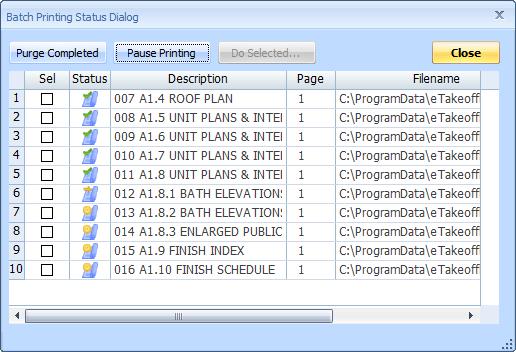
Figure 3: Batch Print Status Window
The status window displays a list of all the drawings added to the queue. One line is displayed for each page to be printed. You can right-click on an individual row and cancel printing, edit the printer configuration or purge the page from the queue. You can select multiple rows and press the "Do Selected" button to cancel, edit the printer configuration or purge for the selected rows. For more information on using the status window, see the Batch Print Status Window.