
Drawing Print Window
The Drawing Print Window is used to set the numerous printing options when printing a drawing.This window can be invoked from the Ribbon Bar’s File/Print/Print current drawing option.
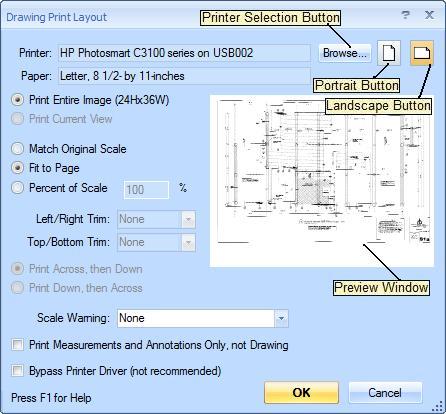
Figure 1: The Drawing Print Window
Preview Window - This window shows what will be printed using different settings. Each page is numbered. If you trim the right or bottom edge, that area will be grayed out and not have a number.
Configuring the Printer
Printer - This box displays the currently selected printer. Press the Printer Selection Button to select a different printer.
Portrait Button - Press this button to use the printer in "Portrait" mode. This button will be have a "pressed" look when portrait mode has been selected. The Portrait Button and the Landscape Button are mutually exclusive - Pressing one will release the other.
Landscape Button - Press this button to use the printer in "Landscape" mode. This button will be have a "pressed" look when landscape mode has been selected. The Portrait Button and the Landscape Button are mutually exclusive - Pressing one will release the other.
Paper - This box displays the currently selected paper size for the printer.
Specifying What to Print
Print Entire Image - Select this option to print the entire drawing (rather than the current view).
Print Current View - Select this option to print the current view as seen in the Main Window (rather than the entire drawing). This option will be disabled if the current view shows the entire drawing.
Scaling the Output
Match Original Scale - Select this option if you want the drawing printed at its original scale. The Preview Window will show the number of pages required.
Fit To Page - Select this option if you want Dimension to scale the output to fit on a single page.
Percent of Scale - Select this option if you want to print the drawing at a specified percentage of the original scale. Then specify the percentage in the edit control
Trimming the Output
In some cases, the printing options selected may result in pages along the right and/or bottom edge that contain no useful information. The options below allow you to "Trim" those edges (not print them). The trim is set separately for horizontal and vertical trimming.
Left/Right Trim - Select "None" to disable horizontal trimming. Select "Left" to trim the left edge of the drawing. Select "Right" to trim the right edge of the drawing. Select "Both" to split the trimmed amount between the left and right edges.
Top/Bottom Trim - Select "None" to disable vertical trimming. Select "Top" to trim the top edge of the drawing. Select "Bottom" to trim the bottom edge of the drawing. Select "Both" to split the trimmed amount between the top and bottom edges.
Sequencing the Pages
Print Across, then Down - Select this option if you want the pages printed row by row. The Preview Window will show the page sequence numbers.
Print Down, then Across - Select this option if you want the pages printed column by column. The Preview Window will show the page sequence numbers.
Scale Warning
When a drawing is printed at a scale other than the original scale, you may want to display a warning message. You can chose one of the following:
None - No scale warning is printed.
Display Over Drawing - The scale warning is printed in the lower left corner, over the drawing.
Display Below Drawing - The drawing print area is slightly reduced (1/4 inch) and the scale warning is printed in the lower left corner, below the drawing. Selecting this option may force more trimming or more pages
If a warning is printed, it will say "Printed at XX% of original size. Verify scale before use." The color of the warning is set in the User Preferences.
Other Controls
Print Measurements and Annotations Only, not Drawing - If this box is checked, the drawing itself will not be printed, just the measurements and annotations. This can be used to lay the printed measurements and annotations over another drawing.
Bypass Printer Driver (not recommended) - Some printer drivers don't support some of the advanced printing commands needed to print measurements and annotations semi-transparently. If this option is selected, an image of each page is generated internally and the entire image is sent to the printed. This can create a very large image and therefore take a long time to print. Use of this option is NOT recommended.
Use Safe Print - Check this box if you are having issues printing certain PDF documents. This option handles PDF files with unsupported elements. NOTE: This option will stayed checked for printing current page until it is unchecked.
OK - Press this button print the drawing with the current settings.
Cancel - Press this button to cancel printing