
Quantity Worksheet Window
The quantity worksheet window is used to organize drawings, measurements and annotations. It also lets you perform calculations and easily transfer them to other applications. Use the View Ribbon bar's Quantity Worksheet button to show or hide the Quantity Worksheet Window
The heart of the worksheet window is the Worksheet Tree/Grid Control (see Figure 1 below). This tree part of the control allows you to define a hierarchy of project information (items). The structure of the hierarchy is up to you. The CSI Master Format structure is often used. It has 16 divisions at the top level, with four or five digit codes at the next level. The tree structure lets you open and close branches in the tree, showing more or less detail. When you open a branch, it's "child" or "member" branches become visible. The grid part of the control allows you to display or hide different columns of information.
You can assign measurements and annotations to the item branches in the tree. This can be done by simply dragging them from the drawing, or you can have them assigned automatically. Assigning measurements to items allows you to accumulate measurement quantities and even use them in calculations. The item quantities can then be dragged and dropped to other applications such as Excel.
Assignments can also be used to drill down to specifics in the drawings. If you're looking for information about a concrete slab, you can browse down through the tree until you find it. Then you can double click on the assigned measurements and annotations and jump to a view of the drawing they came from.
Window Layout
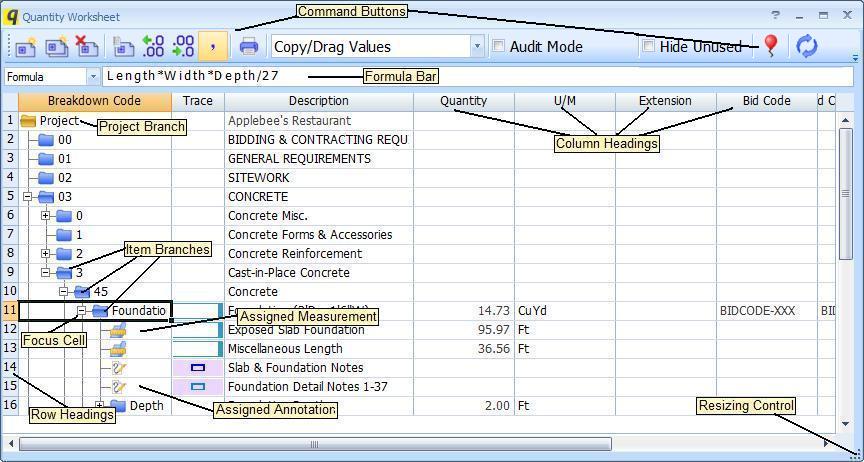
Figure 1: The Quantity Worksheet Window
Figure 1 shows the quantity worksheet window.
Most of the window is taken up by the worksheet grid. The grid is actually
a combination of a grid and a tree. Like a grid, it has columns and rows.
But the rows are hierarchical - like a tree control.
Grid Rows
The first row in the grid is the "Project Branch". Below the project branch are the "Item Branches". There can be multiple levels of item branches. Measurements and Annotations can be assigned to item branches. These assignments are shown as children of the item they're assigned to. Figure 1 shows all the different branch types. They can be easily identified by the unique icon for each type.
Grid Columns
At the top of the grid are the column headings. The columns are highly configurable:
- You can change the width of a column by dragging the line at the end of the column heading.
- You can delete a column by right-clicking on the column heading and selecting "Delete" from the context menu.
- You can insert a column by right-clicking on the column heading, selecting "Insert column" from the context menu and selecting the desired column from the list.
- You can add columns to the end of the grid by right-clicking the square area above the vertical scroll bar. Select "Add column" from the context menu, then select the desired column from the list.
The following columns are available:
- Breakdown Code - This is usually the first column. (We highly recommend that but it's not required.) It includes the tree control lines and boxes and the branch-type icon (see Figure 1). You can left-click the tree control box or double-click anywhere in a breakdown code cell to open or close a branch (show or hide the child branches). For Item Branches, the cells also display the Breakdown Code. In Figure 1, these are numeric codes following the CSI Master Format coding, but breakdown codes are user-defined (see Quantity Worksheet Breakdown Window).
- Description - The Project Branch displays the project description in this column. Item, Measurement and Annotation branches display their associated description. The descriptions can be edited directly in the cell (except the project description).
- Drawing - Measurement and Annotation branches display their drawing name in this column.
- Layer - Measurement and Annotation branches display their assigned layer in this column.
- Quantity - Measurement branches display their measurement quantity in this column. This may be the area, point count, length or perimeter depending on the data type of the measurement's trace. Item branches may display a calculated quantity, the total of the assigned measurements' quantities or a user-defined quantity. The quantity type is specified in the Item Properties Window.
- Trace - Traces define the colors and other characteristics used to display a measurement. The trace column displays a graphical representation of the associated trace. For Measurement Branches, this is the measurement's trace. Item Branches may have a trace which is copied to all measurements assigned to them.
- Unit of Measure or U/M - For Measurement and Item Branches, this column displays the unit of measure for the branch's quantity. The "Unit of Measure" column will display a full description such as "Cubic Yards". The U/M column provides an abbreviated description such as "CuYd". When you focus on a unit of measure cell, a down-arrow button is displayed. You can click on that button and select another unit of measure.
- Extension -
If the item or measurement uses an extension, the extension icon
followed by the extension name is displayed in this column.
If the extension is invalid (not all fields entered), the
extension error icon:
 will be displayed. If a measurement has an extension that
is different than the extension of the item it's assigned
to, the extension name will be displayed in a red emphasized font.
will be displayed. If a measurement has an extension that
is different than the extension of the item it's assigned
to, the extension name will be displayed in a red emphasized font. - Bid Code - The bid code WITHOUT the description is displayed in this column.
- Bid Code Description - The bid code description WITHOUT the bid code is displayed in this column.
- Bid Code - Description - The bid code AND the description are displayed in this column.
- Issues - This column will display a count of the number of issues that reference the measurement or annotation. (It will be blank for worksheet items.) If any of the issues are unresolved or critical, an indicator icon will also be displayed.
- Page - This column will display the drawing page number for the measurement or annotation. (It will be blank for worksheet items.) If a page description exists, that will be displayed also.
In some cases you may want to use several different quantities from the same measurement. For example, the area might determine the carpet required while the perimeter determines the base length. In the Trace Edit Window you can define up to three additional quantities to display for a measurement. The columns below let you display information about the additional quantities. For Item and annotation branches, the cells will be empty.
- Quantity 2 - 4 - The quantity for the additional data type is displayed in this column. This may be the area, point count, length or perimeter depending on data type 2 - 4 of the measurement's trace. If the measurement's trace uses an extension, it may be one of the extension quantities.
- Type 2 - 4 - The measurement's data type 2 - 4 (Area, Count, Length or Perimeter) is displayed in this column. If the measurement's trace uses an extension, it may be one of the extension variables.
- Unit of Measure 2 - 4 or U/M 2 - 4 - This column displays the unit of measure for the measurement's display types 2 - 4. The "Unit of Measure" column will display a full description such as "Cubic Yards". The U/M column provides an abbreviated description such as "CuYd".
Saving and Re-loading Column Configurations
You will probably want to configure the columns differently for different purposes. For example, you might have one configuration for reviewing information and another for transferring information to Excel or other applications.
When you right-click in the column heading (any column), you will see the menu option "Save Column Configuration...". Select it and the Column Configuration Naming Window will appear.

Figure 2: The Column Configuration Naming Window
You can enter a name for the current configuration. If you wish to replace an existing configuration, you can press the down-arrow button and select from the list. Once you have entered a name, press the "OK" button and the configuration will be saved.
To re-load a saved configuration, right-click in the column heading and select "Load Column Configuration" from the menu. A sub-menu will appear listing the saved column configurations. Select a configuration and the columns will be set to match the configuration.
To delete a column configuration you no longer want, right-click in the column heading and select "Delete Column Configuration" from the menu. A sub-menu will appear listing the saved column configurations. Select a configuration and it will be deleted from the saved configurations
Resizing the Quantity Worksheet Window
You can change the size of the quantity worksheet window by dragging the edges or corners of the window or the Resizing Control in the lower right-hand corner of the window. The grid will expand or contract to adjust to the new window size. Dimension will remember the window size and re-use it as you close and re-open the window.
Command Buttons
Above the grid, at the top of the Quantity Worksheet Window are the command buttons:
Add Branch
Press this button to add a child branch to the branch that
currently has focus. For example, to add a top-level
branch, put the focus on the Project Branch and press this
button. The Item Properties Window
will appear. Fill in the item properties and press "OK".
The child item branch will be added. (You won't see it unless
the parent branch is "open".)
This can also be done by selecting "Add a New Item..." from the context menu.
This button will be disabled in the Basic Viewer. It will also be disabled
if you have defined a breakdown structure
and the current node is at the last level of that structure.
Clone Branch
To add an item branch which is similar to another branch,
put the focus on the branch you want to copy and press this button.
The Item Properties Window
will appear, showing a copy of the focus branch's properties.
When cloning an item, you'll see a check box labeled "Clone member items".
If you check this box, the new branch will have a copy of all the original
branch's member items. Measurement and Annotation assignments are
NOT copied.
Modify the item properties as desired and press "OK".
The "sibling" item branch will be added.
This can also be done by selecting "Clone Item..." from the context menu.
This button will be disabled in the Basic Viewer.
Delete Branch
Press this button to delete a branch and all of its descendents.
This can also be done by selecting "Delete Item..." from the context menu.
This button will be disabled in the Basic Viewer.
Branch Properties
Press this button to review and/or change the properties of an Item Branch.
The Item Properties Window
will appear. Modify the item properties as desired and press "OK".
This can also be done by selecting "Display/Edit Item Properties..." from the context menu.
This button will be disabled in the Basic Viewer.
Increase Decimal Places
Press this button to increase the number of decimal places in the Quantity column.
Decrease Decimal Places
Press this button to decrease the number of decimal places in the Quantity column.
Show/Hide Comma Separator
Press this button to show or hide the comma separator for numeric values (12345.00 vs 12,345.00).
Press this button to print the quantity worksheet. The Quantity Worksheet Print Window will be displayed, allowing you to select various options before printing.
Copy/Drag Values or Excel Links
This control has three settings that determine what happens when you drag and drop quantities to another application:
Copy/Drag Values
When this option is selected, quantity values will be transferred.
Copy/Drag Item Links
When this option is selected, Excel formulas will be transferred. The cell value will be the quantity of the item you drag or copy. You should only use this when you have installed the Dimension Excel Add-on and are transferring information to an Excel spreadsheet.
Copy/Drag Bid Code Links
When this option is selected, Excel formulas will be transferred. The cell value will be the total quantity of the all worksheet items using the Bid Code of the item you drag or copy. You should only use this when you have installed the Dimension Excel Add-on and are transferring information to an Excel spreadsheet.
Audit Mode
When this box is Checked, the behavior of the quantity worksheet and the Main Window changes to facilitate auditing:
- As the focus is moved from item to item in the quantity worksheet, the only measurements and annotations displayed in the main windod are those assigned to the item or one of it's sub items.
- Any numeric input items that are blank are displayed with a highlighted background.
Hide Unused
When this box is Checked, unused branches in the tree are hidden. A branch is considered unused when it meets the following conditions:
- It has no measurements or annotations assigned to it
- If it uses a formula, the result of that formula is zero
- Any child branches are also unused
Float Window
Dimension allows you to drag quantity worksheet information to other applications. (See Transferring Information to Other Applications.) This is done by "floating" the quantity worksheet window above the other application. Press this button to start or stop floating the Quantity Worksheet Window.
Recalculate Project
Under normal circumstances, the quantity worksheet is automatically recalculated and measurements are added, changed or deleted. But if your system should fail during one of these processes, the recalculation may not finish. Press this button to recalculate the entire quantity worksheet.
Quantity Worksheet Formula Bar
The Formula Bar in the Quantity Worksheet Window allows you to change the Quantity Calculation and the Quantity Formula for an item without displaying the Item Properties Window.
To edit the formula, place the focus on the desired item, then either press the F2 key or click on the Formula Bar. The formula for the item will be displayed with color coding to indicate references to other items. See Figure 2
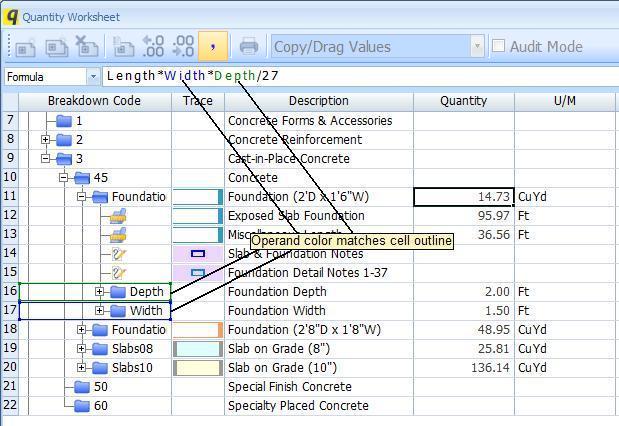
Figure 3: The Quantity Worksheet Formula Bar
Note the item references in the formula ("Width" and "Depth") are color coded. The items referenced have an outline of the same color.
When entering a formula, you can enter an item reference by simply clicking on the desired item node. For more information, see Quantity Worksheet Formula Bar.
Creating and Re-using Quantity Worksheets
The first time you open the Quantity Worksheet Window for a new project, the only branch will be the Project Branch. You begin building the quantity worksheet by putting the focus on the project branch, pressing the Add Branch button and filling in the properties. If you have a number of similar branches, you can create one (including its child branches), then use the Clone Branch button to easily create the rest.
This is a lot of work and it may be necessary for the first project. But if many projects use the same or similar quantity worksheets, you can create Quantity Worksheet Templates to re-use quantity worksheets. A quantity worksheet template is a copy of part or all of an quantity worksheet. First, it doesn't include the measurement and annotation assignments. Secondly, the template may include the entire tree, or just one branch and its descendents. The template is saved as a file outside of the Dimension database.
To create a template, right-click on the branch you want in the
template. To include the entire tree, right-click on the Project Branch.
Select "Save Tree Branch as Template..." from the context menu.
A standard Windows File Save Dialog will be displayed. Specify
the file to contain the template and press "Save".
You've just created an Quantity Worksheet Template.
This capability is not available in the Basic Viewer.
When you're ready to use the template in the quantity worksheet, right-click on any Item Branch and select "Import Template..." from the context menu. A standard Windows File Open Dialog will be displayed. Select the template you want to import and press "Open". The Import Quantity Worksheet Template will be displayed (see Figure 3).

Figure 4: The Import Quantity Worksheet Template Window
When templates are created, they are stored with all of their parent nodes. When they are imported, it often desirable to eliminate some of those parents and/or import them relative to another node.
Figure 4 shows two radio buttons. If you select "Import relative to Project", the original exported parents will be connected to the project node. If you right-clicked on a lower-level node to start import, you can select "Import relative to [node description]". If you select this, the exported parent nodes will be connected to that node.
This often creates a chain of several nodes that aren't needed. Any node that has only one child node can be deleted. Right-click on the node and select "Delete node, move children up".
When you import a template, you can select the individual branches
you want to import. This allows you to import branches as needed. After
you select a template, Dimension creates and displays an import tree.
It compares the template tree to your existing tree and marks any
existing items. In Figure 3, items 01, 02 and 03 are already
in the tree and display an Item Branch icon. The other branches
display a selection check box. Initially all boxes are checked.
You can click on a check box to select or deselect the branch and all of its
descendents. Or you can open a branch and select some of the
descendents. After making the desired selections, press the "Add"
button and the selected branches will be added to the project
quantity worksheet.
This capability is not available in the Basic Viewer.
Assigning Measurements and Annotations
There are three ways to assign measurements and annotations to items.
- Using the automatic assignment feature of the Worksheet Assignment Control
- Using the one-time assignment button on the Work Assignment Control
- Dragging them to the quantity worksheet window and dropping them on the desired item
To assign by dragging and dropping, first position
the quantity worksheet window so that you can see it as well the measurements
and annotations you want to assign. On the
Ribbon Bar Home Tab or the
Ribbon Bar Annotate Tab, click on the
Select button. Then click-down on the measurement or annotation you want to assign.
Holding the mouse button down, drag the measurement or annotation to the
Breakdown Code cell of the Item Branch where you want it assigned. Then
release the mouse button. The assignment is done. If the item branch is open,
you will see the assignment as a member branch. If the item branch
has a trace for its assigned measurements, you will see the
measurement's appearance change.
To remove the assignment, focus on the assignment branch and press the
Delete Branch button.
Assignment is not available in the Basic Viewer.
Transferring Information to Other Applications
Dimension uses the drag and drop technique to transfer information to other applications such as Excel. You can transfer individual cells, rectangles of cells, entire rows, entire columns or even the entire grid.
First, press the Float Window button . Dimension's main window will disappear and the Quantity Worksheet Window will float above all other windows on your screen. Start or switch to the application that will receive the transferred information. Position the quantity worksheet window so you can see both the information you want to transfer and its destination. The transfer is done by selecting the worksheet window cells, then dragging and dropping them. There are several ways to select cells:
- Select single cells by clicking on them.
- Select a rectangle of cells by selecting one corner, then holding the Shift key down while clicking on the opposite corner.
- Select a column by holding the Shift key down while clicking on the column heading. You can select a range of columns by selecting the starting column in the range, then selecting the ending column.
- Select a row by holding the Shift key down while clicking on the row heading (see Figure 1). You can select a range of rows by selecting the starting row in the range, then selecting the ending row.
- Select the entire grid by holding the Shift key down and clicking on the area above the row headings and to the left of the column headings.
The selected cells will have a light blue background and will
be bordered by a blue line. To transfer them, click-down
on one of the selected cells. Holding the mouse button down,
drag the cells to the desired destination in the other application
and release the mouse button.
Context Menu Options
The Context Menu is displayed when you click the right button on the mouse in the Breakdown Code column of the worksheet. It is displayed where the mouse cursor is positioned on the screen. Pressing the right mouse button on a row of the worksheet moves the focus to that row before the context menu is displayed. The context options are then applied to the focus row.
Assignment rows do not have context menus, the Project row and Item rows do. Which menu options are enabled will depend on whether the focus row is the Project row or an Item row. Here are the possibilities:
- Add a New Item... - This option will be enabled for both Project and Item rows. It will be disabled in the Basic Viewer. Selecting this option is the same as pressing the Add Branch Button.
- Clone Item... - This option will be enabled for Item rows only. It will be disabled in the Basic Viewer. Selecting this option is the same as pressing the Clone Branch Button.
- Delete Item - This option will be enabled for Item rows only. It will be disabled in the Basic Viewer. Selecting this option is the same as pressing the Delete Branch Button.
- Display/Edit Item Properties... - This option will be enabled for Item rows only. It will be disabled in the Basic Viewer. Selecting this option is the same as pressing the Branch Properties Button.
- Save Tree Branch as Template... - This option will be enabled for both the Project row and the Item rows. It will be disabled in the Basic Viewer. This option allows you to save the entire project or an item and its children as a template. For more information see Creating and Re-using Quantity Worksheets .
- Hide Assigned Measurements - This option will be enabled for Item rows only. It will be enabled in the Basic Viewer. When an item is "closed", its child items and assignments are hidden. When an item is opened the child items are displayed. The assignments may be displayed or may be hidden. Displaying the child items but hiding the assignments is often useful when dragging worksheet information to other applications. This option controls whether assignments are hidden or displayed. If this open has a check mark, assignments are hidden. Choosing this options toggles the status from hidden to displayed or vice versa.
- Sub-Item Display -
This option will be enabled for both the Project row and the Item rows.
It will be enabled in the Basic Viewer.
Selecting this option displays a sub-menu of display options for
the child items of the focus row, not the focus row itself.
- Open Sub-Items Next Level - Selecting this option will open all the child items for the focus row item. It is equivalent to opening the focus item (if it's not already opened) then opening each of the child items.
- Open Sub-Items All Levels - Selecting this option will open all the child items for the focus row item as well as the child item's child items, etc. for all levels
- Open Sub-Items with Measurements - Selecting this option will open all the child items for the focus row item as well as the child item's child items, etc. for all levels only if the child item has assigned measurements or annotations.
- Close Sub-Items All Levels - This option will be disabled if the focus row item itself is closed. Selecting this option will leave the focus row item opened but will close any child items.
- Hide Sub-Item Measurements Next Level - Selecting this option is equivalent to checking the "Hide Assigned Measurements" option (described above) for all of the focus row item's child items.
- Hide Sub-Item Measurements All Levels - Selecting this option is equivalent to checking the "Hide Assigned Measurements" option (described above) for all of the focus row item's child items, the child item's child items, etc. for all levels.
- Show Sub-Item Measurements Next Level - Selecting this option is equivalent to un-checking the "Hide Assigned Measurements" option (described above) for all of the focus row item's child items.
- Show Sub-Item Measurements All Levels - Selecting this option is equivalent to un-checking the "Hide Assigned Measurements" option (described above) for all of the focus row item's child items, the child item's child items, etc. for all levels.
Shortcut Keys
- Insert Key - Pressing this key is equivalent to pressing the Add Branch button
- Delete Key - Pressing this key is equivalent to pressing the Delete Branch button