
Drawing Comparison
Drawing comparison allows you to overlay two different drawings and see the differences between them. Markings that are common to both drawings are shown in black. Markings that exist in the old drawing but are missing in the new drawing are shown in red. Markings that are added in the new drawing are shown in blue.
Drawing comparison can be used in a variety of ways:
- To compare an original drawing to a revised drawing.
- To compare different floors in a multi-story building.
- To compare a specific unit to the original model in residential construction.
Selecting the Drawings to Compare
The first step in comparing drawings is to display the "old" drawing.
This is the drawing whose unique markings will be shown in red.
Display this drawing using the
Drawing List or Drawing Tree to select
the project and the drawing (and the page if applicable).
With the old drawing displayed, Select the Ribbon Bar’s
Drawing Tab/Compare to New Drawing
button. If no drawing comparisons have been previously defined for the old drawing,
the Drawing Comparison Properties Window will be displayed.
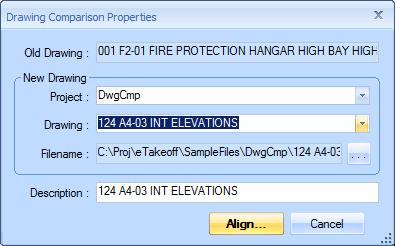
Figure 1: The Drawing Comparison Properties Window
Old Drawing - The field displays the name of the old drawing. It can't be changed.
New Drawing / Project - The field displays the project for the new drawing. Initially it will be set to the same project as the old drawing. You can press the down arrow button and select from a list of existing projects.
New Drawing / Drawing - Once the correct project is selected, you can press the down arrow button to select the new drawing from that project.
New Drawing / Filename - If the new drawing is not part of a project, you can ignore the Project and Drawing controls and select the file directly. When you press the browse button (...) to the right of the filename field, a standard Window File Dialog will appear. Select a file and press the "Open" button.
Description - Dimension keeps a record of all previously defined drawing comparisons. This allows you to recall a comparison without having to redefine it. The Description is used to identify the comparison. As you select a New Drawing / Drawing or a New Drawing / Filename, the description will be filled in automatically to match the drawing or file name (without the extension or folder prefix). You may manually change the description as desired.
Cancel - Press this button to cancel the Drawing Comparison process.
Add - Press this button to continue defining the drawing comparison.
Resizing the Window - The drawing comparison properties window can be re-sized by dragging an edge or a corner. Dimension remembers the last position and size of the window and will restore it there the next time it is used.
Aligning the Drawings
The next step in defining a drawing comparison is to align the two drawings. In many cases, the drawings will need no alignment, but frequently they will be offset or twisted during the scanning process. The Drawing Comparison Alignment Window performs this task.
After you press the Add button above, the old and new drawings are displayed with the red and blue differences. The Drawing Comparison Alignment Window floats above the drawing display. See Figure 2.
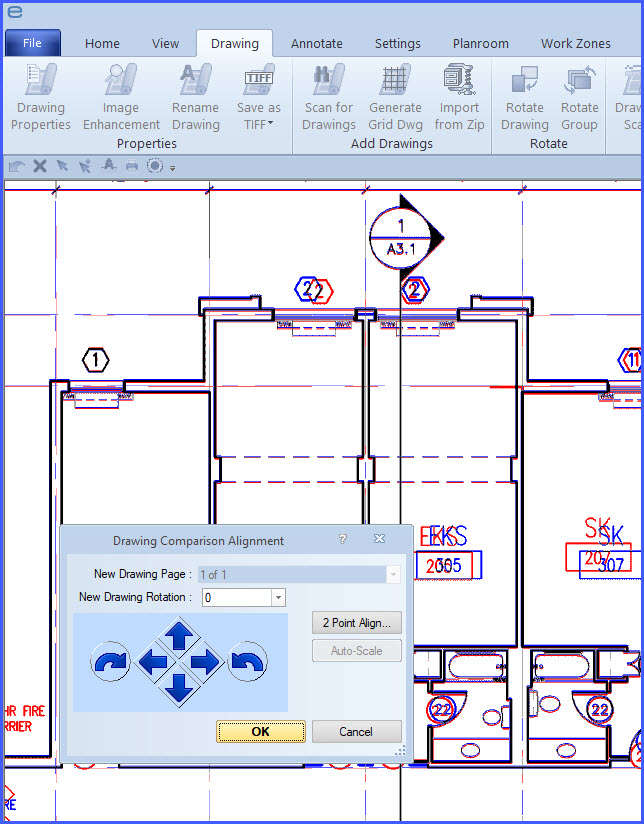
Figure 2: Drawing window with floating alignment window
In Figure 2, the new drawing (blue) is slightly to the left of the old drawing. During the alignment process, you can scroll and zoom the drawing window using any of the standard Dimension techniques.
Selecting the Page and Major Rotation
Before you do the low-level alignment, you should make sure you have the desired page and the correct major rotation (0, 90, 180 or 270 degrees.) To change the page, simply select a new page from "the New Drawing Page" drop-down list. If the major rotation doesn't match the old drawing rotation, select the correct rotation form the "New Drawing Rotation" drop-down list.
Differing Scales and Resolutions
Sometimes the drawings have different scales or resolutions so that the new drawing must resized (expanded or compressed) to match the size of the old drawing.
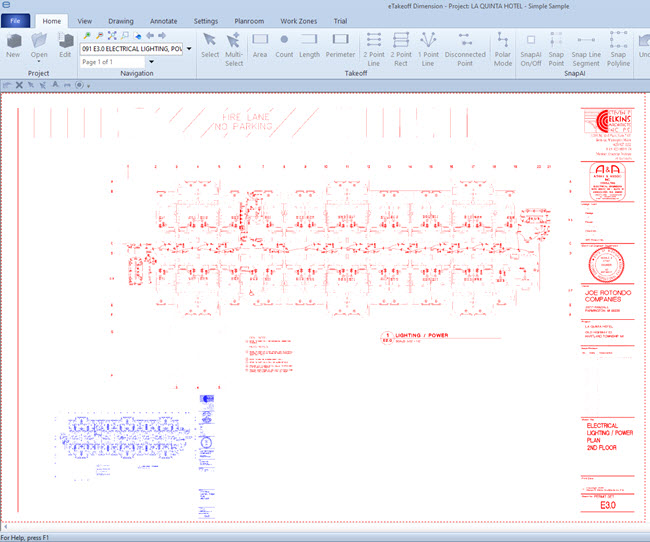
Figure 3: Drawings with different scales or resolutions
Figure 3 shows a case where the new drawing is only a quarter of the size of the old drawing. There are two ways to resize the new drawing
Automatic Scaling
If the drawing scale has been set for both drawings, the resizing can be done automatically. The "Auto-Scale" button will be enabled if this is the case. The new drawing will be automatically resized to match the old drawing. You will probably still need to do the low-level alignment described below.
Two Point Alignment
If Auto-Scale is unavailable or your need to resize based on something other than the drawing scales, you can use two point alignment. With two point alignment, you associate two points in the new drawing with two points in the old drawing. These points should be far apart. To start the process, press the "2 Point Align" button. The first hint window will be displayed.
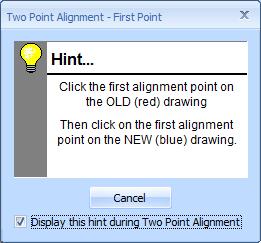
Figure 4: Two Point Alignment - First Hint Window
Click the first alignment point in the OLD (red) drawing. You can hold down the mouse to display the close-up window to position precisely. When you have the correct point, release the mouse. Then click on the first alignment point for the NEW (blue) drawing. As you move the mouse you will see a line drawing from the old point to the mouse cursor.
When you complete the new drawing point, the first hint window will disappear and a second hint window will appear. Repeat the process for the second alignment points: Click on the OLD (red) drawing point then the NEW (blue) drawing point.
When the new point is complete the hint window will disappear. If you selected the points precisely, the two drawing should be aligned correctly. But if needed you can still do low-level alignment.
Low-Level Alignment
The alignment can be changed by rotating the new drawing and/or by moving it. It is best (but not required) to do the rotation first. Look for a long line that appears on both drawings; then rotate the new drawing until the lines are parallel. Then you can move the new drawing until they are precisely aligned.
Aligning with the Alignment Window Buttons
The Alignment Window has six buttons that rotate or move the new drawing:
The Clockwise rotation button rotates the new drawing clockwise.
The Left button moves the new drawing to the left.
The Up button moves the new drawing up.
The Right button moves the new drawing to the right.
The Down button moves the new drawing down.
The Counter-clockwise rotation button rotates the new drawing counter-clockwise.
If you press a button by itself, the new drawing will be adjusted (moved or rotated) just 1 point (about .0025 inch). You can adjusted a larger amount by holding down combinations of the "Shift", "Ctrl" and "Alt" keys while pressing the button. If you hold down one of these keys while pressing the button, the drawing will be adjusted 4 points. If you hold down two of these keys while pressing the button, the drawing will be rotated 16 points. If you hold down all of these keys while pressing the button, the drawing will be rotated 64 points.
If you hold down the alignment buttons, they will repeatedly move or rotate until they are released.
During the alignment process, you can scroll and zoom the drawing window using any of the standard Dimension techniques.
Aligning with the Mouse
Alignment can also be done using the mouse. If you press the left mouse button down and drag the mouse, the new drawing will be dragged in the same direction as the mouse. Depending on your settings, the close-up window may appear as you drag. Be aware that moving and redrawing is a time consuming process. You should drag slowly and pause before releasing the mouse to be sure you're viewing the final move.
Rotation is done by holding down the "Shift" key and the left mouse button key while dragging the mouse. The rotation is done around the center of the drawing. So if you drag the top of the drawing to the right, it will rotate clockwise. If you drag the bottom of the drawing to the right, it will rotate counter-clockwise.
When alignment is completed, press the "OK" button on the alignment window and the alignment window will disappear. Figure 3 shows the same drawings after alignment.
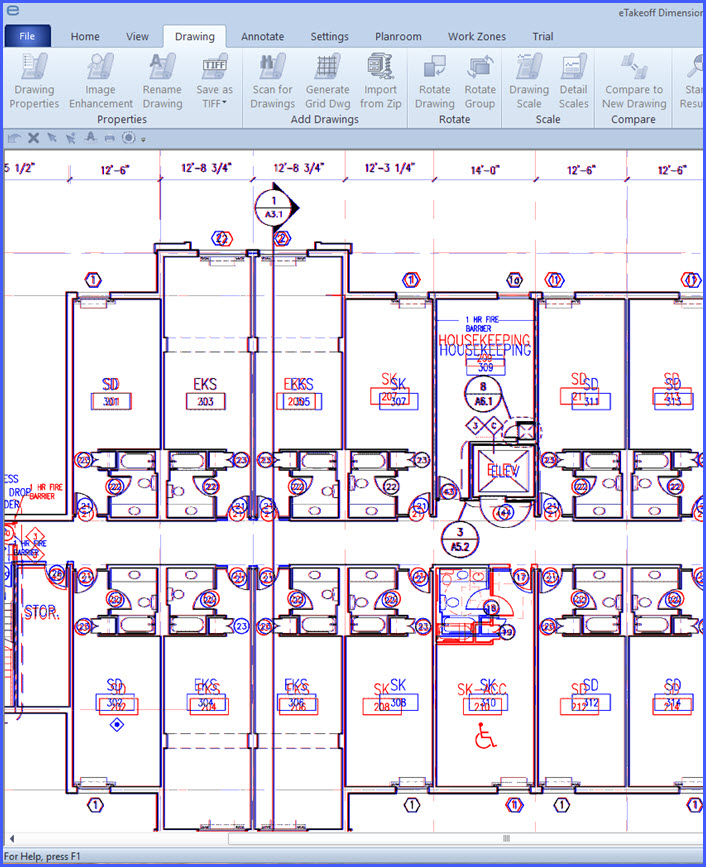
Figure 5: Drawing comparison after alignment
To end the drawing comparison, again select the Main Menu's "Drawing/Compare to New Drawing..." option. Because a comparison is defined (and showing), the Drawing Comparison List Window will be displayed.
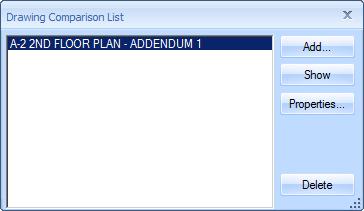
Figure 6: Drawing Comparison List Window
The list window displays a list of all drawing comparisons which have been defined with the current drawing as the "old" drawing. You can add new comparisons, show a defined comparison, hide the comparison currently showing or delete a comparison entirely.
Add - Press this button add a new comparison. The Drawing Comparison Properties Window will be displayed as described above.
Hide / Show - When the list focus is on a drawing comparison that is currently showing, this button will be labeled "Hide". Press it to hide comparison. The comparison will still be in the list. You can display it again later by returning to this window, selecting it in the list and pressing the "Show" button.
Properties - Press this button to review the properties of a previously defined comparison. The Drawing Comparison Properties Window but only the Description can be changed.
Delete - Press this button to delete a comparison. If the comparison is currently displayed, it will be hidden. The comparison will also be deleted form the list. If you wish to use it again, you will have to go through the adding and aligning process described above.
Resizing the Window - The drawing comparison list window can be re-sized by dragging an edge or a corner. Dimension remembers the last position and size of the window and will restore it there the next time it is used.
Drawing Comparison Context Sub-menu
While you are comparing drawings, you can access other drawing comparison features by right-clicking in the drawing window. A context menu will be displayed that includes the menu entry "Drawing Comparison". Selecting this entry will display a sub-menu. The menu will have one or more of the following options:
- Show Old and New - Both the old and new drawings are displayed. The common features are displayed in black. Features that appear only in the old drawing are shown in red. Features that appear only in the new drawing are shown in blue.
- Show Old Only - Only the old drawing is displayed. The common features are displayed in black. Features that appear only in the old drawing are shown in red.
- Show New Only - Only the new drawing is displayed. The common features are displayed in black. Features that appear only in the new drawing are shown in blue.
- Emphasize Old - Both the old and new drawings are displayed. The common features are displayed in black. Features that appear only in the old drawing are shown in red. Features that appear only in the new drawing are shown in a very faint blue.
- Emphasize New - Both the old and new drawings are displayed. The common features are displayed in black. Features that appear only in the old drawing are shown in a very faint red. Features that appear only in the new drawing are shown in blue.
- Hide Comparison - Selecting this options will hide the drawing comparison so that only the old drawing is displayed (in black and white).
- Move/Copy Measurements and Annotations - This option will only be displayed if you have one or more measurements and/or annotations selected. You can use this feature to move or copy measurements and/or annotations from the old drawing to the new drawing. For more information, see Copy Measurements and Annotations Window.