
Drawing Import Output Folder/Project Window
This window is the first step in the import process.
It is used to specify the folder and/or the Dimension project
that the imported drawings will be added to.
This windows can be used in three ways:
- Import the drawings into an existing Dimension project.
- Create a new Dimension project and import the drawings into that project
- Import the drawings into a folder but don't add them to a Dimension project.
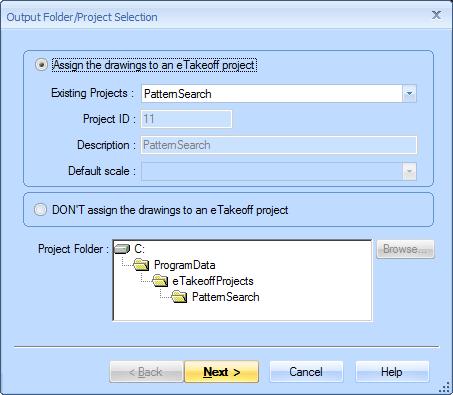
Figure 1: The Output Folder/Project Selection Window
Assign the drawings to a Dimension project - Check this radio button if you want to assign the drawings to a new or existing Dimension project.
Existing Projects : -
This Combo-box has a list of existing Dimension projects
(plus a "(none)" entry at the beginning of the list).
If you wish to assign the drawings to an existing project,
simply select the project from this list and proceed to the next step.
If you wish to create a new project, select "(none)". You will then need
to enter the Description and select a Project Folder.
Project ID : - The is a code used internally by Dimension to uniquely identify the project. It is displayed here in case it's needed for user support.
Description : - For existing projects, the description is displayed here and can't be changed. For new projects, the description must be entered here.
Default Scale : - For existing projects, the default scale is displayed here and can't be changed. For new projects, a default scale may be selected but isn't required.
DON'T assign the drawings to a Dimension project - Check this radio button to import drawings WITHOUT associating them with a Dimension project.
Project Folder : - For existing projects, the project folder is displayed here and can't be changed. For new projects, a project folder must be selected by pressing the button on the right. This will display a standard Windows Folder Selection Window.
Root Folder : - A root folder must be selected by pressing the button on the right. This will display the Dimension Folder Selection Window to select a folder. The imported drawings will be placed in this folder (or one of its sub-folders).
Next - Once you have entered or selected the required information, press thse button to proceed to the next step in the import process, the Name Mapping Window.
Cancel - Press this button to cancel the drawing import process.