
Ribbon Bar Annotate Tab
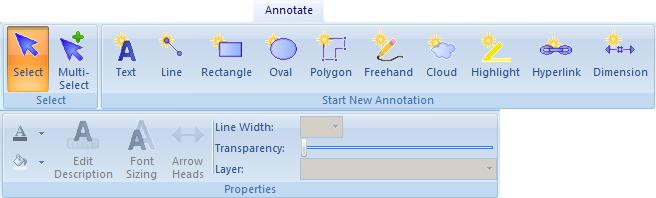
The Annotate tab of the Ribbon Bar is used to create annotations and edit their properties.
Select

Select
To select a measurement or annotation, press this button, then click on the desired measurement or annotation. The selected measurement or annotation will display yellow circular selection symbols for all points. This button will look like it is "down" whenever you are in select mode. Shortcut: You can switch to select mode by pressing the "Enter" key or the "S" key.

Multi-Select
To select multiple measurements and/or annotations, press this button, then click on the
desired measurements or annotations. If you click on a measurement that is
already selected, it will be de-selected.
You can also select by dragging a rectangle around the desired measurements
and/or annotations. Press the left mouse button down on one corner of the selection
rectangle, drag the mouse to the opposite corner, then release the left mouse button.
Any measurements or annotations that fall entirely inside the rectangle that were
not previously selected will be selected. If everything inside the rectangle
was already selected, they will be de-selected.
The selected measurements and/or annotations
will display yellow circular selection symbols for all points.
This button will look like it is "down" whenever you are in multiple-select mode.
This feature is available with Pro-Plus, Advanced,
Premier and the Drawing Compare Add-on.
Start New Annotation

Add Text Annotation
To create a new text annotation, press this button then click on the desired upper-left corner of where you want the text to appear. After you click, the Text Edit Window will appear. Type in the desired text then press the Enter key. If you want to start a new line in the text, hold the Shift key down while pressing the Enter key.

Add Line Annotation
To create a new line annotation, press this button then click the line points. You can hold down the "Ctrl" key while clicking to force the line from the previous point to the new point to be horizontal or vertical.

Add Rectangle Annotation
To create a new rectangle annotation, press this button then click on two opposite corners on the desired rectangle (upper-left and lower-right or lower-left and upper-right). As you click the second point, you can hold the mouse button down and see the exact position of the rectangle.

Add Oval Annotation
To create a new oval annotation, press this button then click on two opposite corners on the desired oval (upper-left and lower-right or lower-left and upper-right). As you click the second point, you can hold the mouse button down and see the exact position of the oval.

Add Polygon Annotation
A polygon annotation is a series of points that are connected together by lines. A line is also drawn from the last point to the first. To create a new Polygon annotation, press this button then click on the polygon points. You can change the polygon line color and fill color.

Add Freehand Annotation
To create a new Freehand annotation, press this button then hold the left mouse button down to draw. You can release the mouse button, move to another point and continue drawing.

Add Cloud Annotation
To create a new Cloud annotation, press this button then click to add points to the annotation. Note: Be sure to click the points in a clockwise direction. You can hold down the "Ctrl" key while clicking to force the line from the previous point to the new point to be horizontal or vertical. A "cloud" will be drawn from the first point to each successive point and back to the first.

Add Highlight Annotation
To create a new Highlight annotation, press this button then hold the left mouse button down to draw. You can release the mouse button, move to another point and continue drawing.

Add Hyper-link Annotation
A hyper-link annotation is used to quickly jump from your current view to another view in the same on a different drawing. To create a new hyper-link annotation, press this button then click on the desired upper-left corner of where you want the link indicator to appear. After you click, the Hyper-link Hint Window will appear. Navigate to the desired drawing zoom and scroll to the desired view then press "Set Destination" button in the Hyper-link Hint Window.

Add Dimension Annotation
A dimension annotation is a two point line that displays the distance between the two points. To create a new Dimension annotation, press this button then click on the two points. You can add arrows to the end of the annotation and change the color, text font and text rotation.
Properties

Change Text/Foreground Color
Press this button change the text/foreground color of the annotation you're working on. The standard Windows Color Selection Dialog will be displayed. Select the desired color and press OK. If you need help using the color selection dialog, press the "?" button in the dialog's caption then click on the control you want to know more about.

Change Background Color
Press this button change the background color of the annotation you're working on. All annotations except lines and freehand have a background color. The standard Windows Color Selection Dialog will be displayed. Select the desired color and press OK. If you need help using the color selection dialog, press the "?" button in the dialog's caption then click on the control you want to know more about.

Edit Description
You can add descriptive text to annotations. This text will appear in
the "tool tips" displayed when the mouse is paused over the annotations.
To add or edit the description for the annotation you're working on,
press this button. The Description Edit Window
will appear. Type in the desired text, then press the Enter key.
If you want to start a new line in the text, hold the Shift key
down while pressing the Enter key.
Press the Escape key to cancel description editing
This button will be disabled in the Basic Viewer.

Font Sizing
Press this button to toggle dynamic font sizing between
on and off. Only text annotation use font sizing.
When sizing is off, the text is always displayed in the selected
font size, no matter how much the drawing is zoomed in or out.
When sizing is on, the font size changes as you zoom.
When the drawing is displayed in its original size, the text
will be displayed in the selected font size. As you zoom in or out,
the font is proportionally larger or smaller.

Arrow Heads
Line and Dimension annotations can display an arrow at the start and/or the end of the annotation. When creating or editing a line or dimension annotation, you can press this button to display the Arrow Setting Dialog to edit the arrow settings for the annotation.

Line Width
The Line width shows a number in an edit box with a down-arrow button to its right. To change the line width for the annotation you're working on, press the down-arrow button and click on the desired line width in the displayed list. Only line, rectangle, oval, freehand and cloud annotations use line width.
Transparency
Transparency controls how much of the drawing can be seen through the annotation. Move this slider to the left to make the annotation more transparent. Move it to the right to make the annotation more opaque.

Layer
The layer for the current annotation shows with a down-arrow
button to its right.
To change the layer for the annotation you're working on,
press the down-arrow button and click on the desired layer
in the displayed list.
Warning: If you select a layer this isn't visible, the annotation
you're working on will disappear (be hidden) when you select or add
another annotation.
To edit layers and set their visibility, click on the Ribbon Bar Settings Tab / Edit Layers Button
to display the Edit Layers Window.