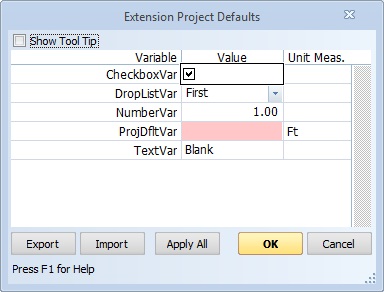
Extension Project Defaults Window
This document describes how extension defaults are edited and reviewed for a project. It assumes that you are already familiar with extensions in general. If not, we suggest you read the document Extensions Overview . It also assumes that you have cre4ated extensions and made some of their variables project defaults. For more information on setting project defaults see Extension Fields Properties.
This window is displayed when you press the "Defaults" button in the Project Properties Window.

Figure 1: Extension Project Defaults Window
One you set the project defaults, they will be used for in any measurement using an extension that uses one of the variables. Once you have set the extension variable values for a measurement, subsequent changes to the project defaults will not change those values unless you Apply the changes as described below.
The variables shown will include all the extension variables that have been checked as Project Defaults. Most of the window is filled with the extension values grid. This grid has one row for each extension variable that is a project default. It has the following columns:
Variable - This is the name of the variable. If you hover the mouse cursor over this column it will display a tool tip with the full description of the variable.
Value - This is the current value of the variable. For Check Box variables it will display a simple checkbox. For Formula variables it will display the calculated value of the variable. For numeric input variables it allows you to enter the desired value for the variable. For numeric input variables with invalid values and for formula variables that use invalid variables, a highlighted background will be displayed. For formula variables, you can hover the mouse cursor over the cell to display the actual formula.
Unit Meas. - This column displays the unit of measure for the variable.
Show Tool Tip - If this is checked, the tool tip for each variable will be displayed automatically when the focusl moves ot that variable row.
When you have finished editing, you can press the "OK" button to save the values entered or press the "Cancel" button to discard them.
You can change the size of the window by dragging one of its edges. You can change the size of the grid columns by dragging the column separator lines in the grid heading.
Exporting and Importing Project Defaults
You may want to reuse project defaults from project to project. Once you have set the defaults to what you want to reuse, press the "Export" button. The file selection dialog will be displayed to specify where the exported standards should be saved. For example, you might use the file "HighEndCommercial.prjdflt". Press the "Save" button in the dialog and the current defaults will be saved in that file.
To reuse the saved project defaults for another project, display the project defaults window for that project. Then press the "Import" button and select a file previously created via "Export". The values in that file will replace the values for the current project.
Applying Project Defaults to Existing Measurements
Changing the project defaults does NOT change the values for existing measurements. But you can apply the current defaults to all existing measurements in two ways.
- If you press the "Apply All" button below the grid, all project default values will be applied to all existing measurements.
- If you right-click on the variable name for an individual default and select the context menu option "Apply value to all existing measurements", the value for that variable only will be applied to all existing measurements.
