
Work Zone Report Window
This window displays a list of all the measurement and/or partial measurement quantities per work zone in the current project. Measurement or partial measurement quantities will NOT be displayed in this report if they are NOT assigned to a work zone.

Figure 1: The Work Zone Report Window
Most of the window is taken up by the work zone measurement or partial measurement quantities. Above the Work Zone Report is the toolbar.
Toolbar Buttons
The buttons in the toolbar are used to change the Quantity column decimal places, print the list or float the list to drag and drop measurements to other applications.
Increase Decimal Places
Press this button to increase the number of decimal places in the Quantity column.
Decrease Decimal Places
Press this button to decrease the number of decimal places in the Quantity column.
Show/Hide Comma Separator
Press this button to show or hide the comma separator for numeric values (12345.00 vs 12,345.00).
Press this button to print the Work Zone Report. The Work Zone Report Print Window will be displayed, allowing you to select various options before printing.
Copy/Drag Values
This control allows you to copy measurements to the clipboard or drag and drop them to another application.
Show/Hide Subtotals
When the Work Zone Report is sorted, you can show or hide subtotals by clicking this button. See Sorting and Subtotaling Rows.
Show/Hide Measurement Detail
When the Work Zone Report is sorted and totaled, you can show or hide measurement detail by clicking this button.
Float Window
Dimension allows you to drag Work Zone Report information to other applications. (See Transferring Information to Other Applications.) This is done by "floating" the Work Zone Report window above the other application. Press this button to start or stop floating the Work Zone Report Window.
Synchronize
If this on/off button is selected, as you move from measurement to measurement in the list, the corresponding drawing and measurement will be displayed and selected in the Main Window. The focus will NOT switch to the main window as it does when you double-click on a measurement.
Preferences
Press this button to display and set the user preferences for the Work Zone Report. The preferences window will be displayed.
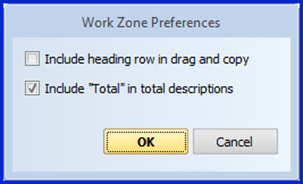
The Work Zone Report Preferences Window
If you check "Include heading row in drag and copy", when you drag and drop or copy and paste a rectangle of cells from the Work Zone Report, a row will be inserted at the top with the column descriptions.
If you check "Include "Total" in total descriptions", total descriptions will start with leading blanks and have " Total" appended to the end of the description. If this is un-checked, just the simple description will be displayed. This is useful when you are totaling by bid code and only displaying totals. When you paste into a spreadsheet, the simple bid code can be used to categorize the total.
Save as CSV File
Pressing this button to save the currently selected rectangle of cells in a CSV file. A File Selection dialog will be displayed to select or specify the file to be created. CSV files can be used by Excel and/or other applications to import columns and rows of information. Some estimating applications import quantities via CSV files.
The Work Zone Report
Columns
The Work Zone Report control shows a list of all the measurements in the current project (for all drawings).
At the top of the list are the column headings. The columns are highly configurable:
- You can change the width of a column by dragging the line at the end of the column heading.
- You can delete a column by right-clicking on the column heading and selecting "Delete" from the context menu.
- You can insert a column by right-clicking on the column heading, selecting "Insert column" from the context menu and selecting the desired column from the list.
- You can add columns to the end of the list by right-clicking the square area above the vertical scroll bar. Select "Add column" from the context menu, then select the desired column from the list.
- Once you have the columns configured for a particular purpose, you can save that configuration and re-load it latter.
The following columns are available:
- Description - The measurement's description is displayed in this column.
- Drawing - The measurement's drawing description is displayed in this column. If you pause the mouse over a cell in this column, a tool tip will display the drawing filename.
- Layer - The layer to which the measurement is assigned is displayed in this column.
- Quantity - The default quantity for the measurement is displayed in this column. This may be the area, point count, length or perimeter depending on the data type of the measurement's trace.
- Trace - Traces define the colors and other characteristics used to display a measurement. The trace column displays a graphical representation of the measurement's trace.
- Type - The measurement's default data type (Area, Count, Length or Perimeter) is displayed in this column.
- Unit of Measure or U/M - This column displays the unit of measure for the measurement's quantity. The "Unit of Measure" column will display a full description such as "Cubic Yards". The "U/M" column provides an abbreviated description such as "CuYd". On total lines, the unit of measure will be displayed only if all the totaled measurements use the same units.
- Extension -
If the measurement uses an extension, the extension icon
followed by the extension name is displayed in this column.
If the extension is invalid (not all fields entered), the
extension error icon:
 will be displayed.
 - Bid Code -
selecting this column will display a sub-menu of options:
- Bid Code - The bid code WITHOUT the description is displayed in this column.
- Bid Code Description - The bid code description WITHOUT the bid code is displayed in this column.
- Bid Code - Description - The bid code AND the description are displayed in this column.
- #Asn - This column will display the number of quantity worksheet items the measurement has been assigned to. If you sort by this column (ascending), the unassigned measurements will appear at the top of the list and the multiply assigned measurements will appear at the bottom.
- Issues - This column will display a count of the number of issues that reference the measurement. If any of the issues are unresolved or critical, an indicator icon will also be displayed.
- Page - This column will display the measurement's page number.
- Det# - This is the Detail Number for the measurement. As drawings, measurements, annotations, quantity worksheet items, issues, etc. are added to a project, they are allocated a sequential detail number. Sorting measurements by their detail number will put them in the sequence in which they were created. Be aware that not all sequential numbers will appear because many are allocated for details other than measurements.
- Created - This column will display the date and time the measurement was created
- Created By - This column will display user name of the person who created the measurement. The user name will be blank until the user name has been set using the User ID Window.
- #EstAsn - This column will only be displayed if you have installed Dimension's SmartBridge. SmartBridge integrates Dimension with estimating applications. This column displays the number of times SmartBridge has assigned this measurement to estimating.
In some cases you may want to use several different quantities from the same measurement. For example, the area might determine the carpet required while the perimeter determines the base length. In the Trace Edit Window you can define up to three additional quantities to display for a measurement. The columns below let you display information about the additional quantities. These are shown in the column menu as "Quantity 2", "Quantity 3" and "Quantity 4". When you select one of those menu entries, you will see a submenu:
- Quantity - The quantity for the additional data type is displayed in this column. This may be the area, point count, length or perimeter depending on data type 2 - 4 of the measurement's trace. If the measurement's trace uses an extension, it may be one of the extension quantities.
- Type - The measurement's data type 2 - 4 (Area, Count, Length or Perimeter) is displayed in this column. If the measurement's trace uses an extension, it may be one of the extension variables.
- Unit of Measure or U/M - This column displays the unit of measure for the measurement's display types 2 - 4. The "Unit of Measure" column will display a full description such as "Cubic Yards". The U/M column provides an abbreviated description such as "CuYd". On total lines, the unit of measure will be displayed only if all the totaled measurements use the same units.
Extension Columns
The final entry in the Column menu is "Extension Columns". Selecting this will display a sub-menu of all the extension variables Extension variables can be tagged for use as columns when editing the Variable Properties
Work Breakdown Columns
Once you have defined work breakdown categories, you can add those categories as columns in the grid and edit the measurement's values. You can type the value into the control or press the down-arrow to select from the defaults for the category. If the category is locked, you may only use an existing default value. If the category is unlocked and you enter a new value, it will be added to the defaults for the category. See Work Breakdown Category Maintenance for more information on locking categories.
Copying and Pasting Cells
The Work Zone Report allows you to copy and paste cell values. The cell types must match for the paste to work. For example, you can't copy Measurement Descriptions into Work Breakdown Values.
The first step is to select a range of cells to copy. There are several ways to select cells:
- Select single cells by clicking on them.
- Select a rectangle of cells by selecting one corner, then holding the Shift key down while clicking on the opposite corner.
- Select a column by holding the Shift key down while clicking on the column heading. You can select a range of columns by selecting the starting column in the range, then selecting the ending column.
- Select a row by holding the Shift key down while clicking on the row heading (see Figure 1). You can select a range of rows by selecting the starting row in the range, then selecting the ending row.
- Select the entire grid by holding the Shift key down and clicking on the area above the row headings and to the left of the column headings.
Then right-click in the selected area and choose "Copy cells to Dimension Clipboard" from the context menu. The copied cells will be outlined with a green border
Then select the cells where you wish to paste. Use the same selection techniques described above.
Then right-click in the selected area and choose "Paste cells from the Dimension Clipboard" from the context menu.
Sorting and Subtotaling Rows
You can sort the rows by the value of a multiple columns. To sort by a single column, right-click on the heading of the desired column and select "Sort by XXXX, Ascending" or "Sort by XXXX, Descending">
Once the initial sort is selected, you can sort within that sequence by another column. Right-click on the heading of the desired column and select "Sub-Sort by XXXX, Ascending" or "Sub-Sort by XXXX, Descending">
Once a sort sequence is defined, you can show or hide subtotal rows by pressing the Subtotal button in the toolbar. Subtotal rows are displayed in a bold font. When the subtotals are displayed you can press the Measurement Detail button in the toolbar to show or hide the measurement detail.
Saving and Re-loading Display Configurations
You will probably want to configure the display differently for different purposes. For example, you might have one configuration for reviewing measurements and another for transferring information to Excel or other applications.
When you right-click in the column heading (any column), you will see the menu option "Save Column Configuration...". Select it and the Column Configuration Naming Window will appear.

Figure 2: The Column Configuration Naming Window
You can enter a name for the current configuration. If you wish to replace an existing configuration, you can press the down-arrow button and select from the list. Once you have entered a name, press the "OK" button and the configuration will be saved. The configuration includes the following information:
- The columns currently displayed and their widths
- The current sort sequence for the measurements
- The number of decimal places displayed
- Whether or not comma separators are displayed
- Whether or not total rows are shown
- Whether or not detail rows are shown
- The Work Zone Report Preferences
To re-load a saved configuration, right-click in the column heading and select "Load Column Configuration" from the menu. A sub-menu will appear listing the saved column configurations. Select a configuration and the columns will be set to match the configuration.
To delete a column configuration you no longer want, right-click in the column heading and select "Delete Column Configuration" from the menu. A sub-menu will appear listing the saved column configurations. Select a configuration and it will be deleted from the saved configurations
Resizing the Work Zone Report Window
You can change the size of the Work Zone Report window by dragging the edges or corners of the window or the Resizing Control in the lower right-hand corner of the window. The list will expand or contract to adjust to the new window size. Dimension will remember the window size and re-use it as you close and re-open the window. Separate sizes are remembered for when the window is floating and when it's not.
Transferring Information to Other Applications
Dimension uses the drag and drop technique to transfer information to other applications such as Excel. You can transfer individual cells, rectangles of cells, entire rows, entire columns or even the entire grid.
First, press the Float Window button . Dimension's main window will disappear and the Work Zone Report Window will float above all other windows on your screen. Start or switch to the application that will receive the transferred information. Position the Work Zone Report window so you can see both the information you want to transfer and its destination. The transfer is done by selecting the worksheet window cells, then dragging and dropping them. There are several ways to select cells:
- Select single cells by clicking on them.
- Select a rectangle of cells by selecting one corner, then holding the Shift key down while clicking on the opposite corner.
- Select a column by holding the Shift key down while clicking on the column heading. You can select a range of columns by selecting the starting column in the range, then selecting the ending column.
- Select a row by holding the Shift key down while clicking on the row heading (see Figure 1). You can select a range of rows by selecting the starting row in the range, then selecting the ending row.
- Select the entire grid by holding the Shift key down and clicking on the area above the row headings and to the left of the column headings.
The selected cells will have a light blue background and will
be bordered by a blue line. To transfer them, click-down
on one of the selected cells. Holding the mouse button down,
drag the cells to the desired destination in the other application
and release the mouse button.