This window is the third step in the import process. It is used to build and display the list of files to be imported. This window can be redisplayed later in the import process; while files are being imported or after importing all files.
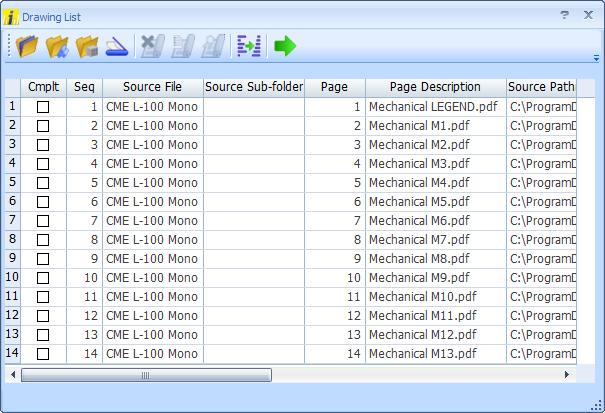
Figure 1: The Drawing List Window
Most of the window is taken up by the drawing list. This list shows all the drawings selected for importing. Above the drawing list is the toolbar.
Toolbar Buttons
The buttons in the toolbar are used to add drawings to the list, delete drawings from the list, display drawings or their properties, resequence the list and start the import process.
![]()
Select Files
Press this button to select one or more files to be added to the list. A standard Windows File Open dialog will be displayed. You can select a single file by clicking on it. You can select additional single files by holding down the “Ctrl” key while clicking on them. You can select a range of files by click on the first file, then holding down the “Shift” key while clicking on the last file. When you have selected the desired file or files, press the “Open” key and the selected files will be added to the drawing list.
![]()
Search Folder
Press this button to search a folder and its sub-folders for files to be added to the list. The Dimension Folder Selection Window will be displayed to select a folder. Select the desired folder and press “OK”. The Folder Scan for Drawings Window will be displayed.
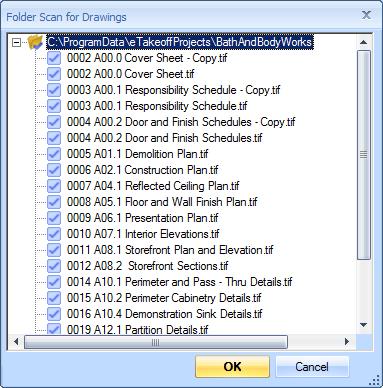
Figure 2: The Folder Scan Window
This window displays a tree of the selected folder, its sub-folders and all drawing files found. Initially all files will be selected. You can click on the checkboxes to select or deselect individual files or entire folders. When you are finished, press the “OK” button and the selected files will be added to the drawing list.
![]()
Rename Project Drawings
Press this button to add drawings that are already part of the project. During the import process, the drawing files will be unchanged but the drawing and page descriptions will be changed. A list of the project drawing files will be displayed.
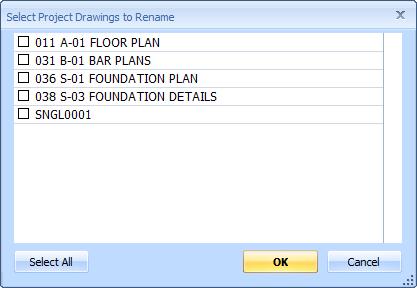
Figure 3: The Existing Drawing File Selection Window
This window displays a list of all the files that are currently part of the project. Initially none of the files will be selected. You can click on the checkboxes to select or deselect individual files or press the “Select All” button in the lower-left corner to select or de-select all drawings.
To select (or de-select) a range of drawings, click on the name of the top drawing in the range to put the focus on the that row. Then click on the checkbox of the bottom drawing of the range. All drawings in the range will be selected or de-selected.
When you are finished, press the “OK” button and the selected files will be added to the drawing list.
![]()
Import from Scanner
Press this button to import from a scanner. Different dialogs will be displayed to select the scanning hardware and operate it. The actual windows displayed will depend on what hardware you have. As drawings are scanned, they will be added to the drawing list.
![]()
Delete File
Click on one of the rows in the drawing list, then press this button to delete that row from the list. The original file will NOT be deleted.
![]()
Display File Properties
Click on one of the rows in the drawing list, then press this button to display the properties for the file in the Drawing Properties Window. Press the “Close” button in that window to return to the Drawing List Window.
![]()
View Drawing
Click on one of the rows in the drawing list, then press this button to view the drawing in the Dimension Import Main Window. The Drawing List window will still be displayed.
![]()
Resequence Drawings
Press this button to reset the import sequence to match the current order of the drawings in the list. As drawings are initially added to the list, they are placed at the end of the list and assigned consecutive sequence numbers.
You can change the sequence of the list by sorting the list or by moving rows. But changing the list does NOT change the import sequence. Pressing this button does. When you press this button the Resequence Confirmation Window will be displayed.
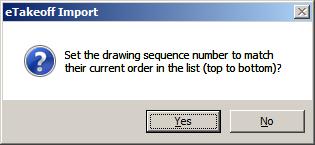
Figure 4: The Resequence Confirmation Window
Press the “Yes” button to change the import sequence to match the current list sequence.
![]()
Begin Importing
Press this button to begin the Import/Conversion process. The Drawing Conversion Window will be displayed for each row in the list.
You can return to the Drawing List Window by closing the conversion window, then pressing the Display Drawing List Button in the Main Toolbar.
The Drawing List
Columns
The Drawing List has the following columns:
Cmplt – This column is a check box. The box will be checked if the drawing has already been imported.
Seq – This column displays the import sequence. By default, files are imported in the same sequence they are added to the drawing list. But the import sequence can be changed by reorganizing the list then pressing the Resequence Drawings Button.
Source File – This column displays the filename (without the path) that the drawing originally came from.
Source Sub-folder – This column displays the sub-folder that the drawing originally came from. Sub-folders are only defined for files which were added to the list via the Search Folder Button.
Page – This column displays the page number for source files that have multiple pages. When a multi-page PDF or TIFF file is added to the list, one row is added for each page in the file.
Source Pathname – This column displays the full pathname of the file.
Description – This column displays the Dimension description for the file. This column will be empty until the file has been converted.
Output File – This column displays the output filename (without path) for the converted file. This column will be empty until the file has been converted.
Output Sub-folder – This column displays the output sub-folder for the converted file. The Sub-folder is relative to the Dimension Project Folder or the Root Folder specified in the Output Folder/Project Selection Window. This column will be empty until the file has been converted.
Error Msg – This column will display any error encountered when converting the file. This column will be empty until the file has been converted.
Name Mapping – This column will display the name mapping to be used during conversion
Rotation – This column will display the output rotation used when converting the file. This column will display “None” until the file has been converted.
User Input – This column will display the User Input specified during conversion. This column will be empty until the file has been converted.
Reconfiguring the Columns
You can change the width of a column by clicking down on the line between the column headings and dragging it left or right.
You can delete a column by right-clicking on the column’s heading and selecting “Delete column XXXX” from the context menu.
You can insert a column by right-clicking on the heading of the column you want to insert before. Select “Insert column before XXXX” then select the column you wish to insert.
You can add a column to the end by right-clicking on the heading space above the vertical scroll bar. Select “Add column to end of grid” then select the column you wish to add.
Sorting Rows
You can sort the rows by the value of a particular column. Right click on the column heading and select “Sort by XXXX, Ascending” or “Sort by XXXX, Descending”>
Selecting Multiple Rows
Multi-row operations start by selecting rows. To select a single row, click on the row heading. The row heading is the gray area on the left of the grid displaying the row number. Selected rows are displayed with a light blue background. To select additional rows, hold down the “Ctrl” key while clicking on the row header. To select a range of rows, click on the row heading of the first row. Then hold down the “Shift” key and click on the row heading of the last row. The first row, last row and all rows in between will be selected.
Deleting Selected Rows
To delete the selected rows, right-click in the row heading of one of the selected rows. Then select “Delete N SELECTED row(s)” from the context menu. You can also delete a single row by right-clicking in the row heading and selecting “Delete row N” from the context menu.
Reorganizing Rows
Once you have selected rows, you can move them to another place in the list. To move them to before another row, right-click on the row heading of the row you want them to go before. Then select “Move N selected rows to before row X” from the context menu.
To move the selected rows to the end, right-click on any row heading. Then select “Move N selected rows to End” from the context menu.
Resizing the Window
This window is resizable. You can change its size with the mouse by clicking and dragging an edge of the window or the “grabber” control in the lower-right corner of the window.