SnapAI Overview

eTakeoff’s SnapAI technology utilizes drawing information stored in vector PDF files to enable the user to quickly and easily “snap” the cursor to points, lines, and polylines while taking off a project. It has added intelligence to the snapping / takeoff process. This includes:
- The ability to detect the direction the user wishes to use in the measurement,i.e. clockwise or counterclockwise.
- A sense indicator to assist the user in Selection.
- A detection indicator to show what has been detected.
- The ability to perform all detection sensing while the cursor is moving.
- The ability to snap to a point, snap to a line and snap to a set of logically connected lines (Polyline).
SnapAI only works with vector PDF files. If the user loads a non-vector PDF file, SnapAI will be disabled. Below is an explanation of the different types of files that eTakeoff supports.
Vector PDF Files:
- are constructed using mathematical formulas.
- use line segments to define all the geometry on the page.
- Most PDFs created from CAD are vector-based.
- SnapAI only works with vector PDF files.
Non-Vector files:
- Examples of Non-Vector files:
- Raster PDF files- are created from scanning a drawing.
- BMP – Windows Bitmap Format.
- CAL – US Department of Defense.
- CPC – Cartesian Perceptual Compression.
- GIF – Graphics Interchange Format.
- IVS – IPIN Viewing System format.
- JPEG – Joint Photographic Experts Group Interchange Format.
- PNG – Portable Network Graphics Format.
- TIFF – Tagged Image File Format – Group 3 or 4.
- All of these files are pixel-based; like ink on paper.
- None of these files have data that can be extracted to aid in the “Snap” process.
More Information on SnapAI
Performing Takeoff with SnapAI
Load Complex Objects
When the user opens a drawing page, the program attempts to extract the vector objects needed for the SnapAI process. If it identifies that the page is going to take several seconds to process, the following window will be displayed:
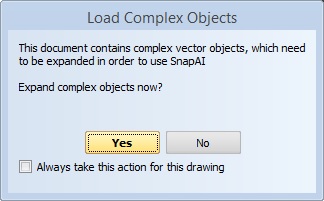
This window allows the user to decide if the page should be processed.
- Click “Yes” if you want the page to be processed. SnapAI will be enabled for that page.
- Click “No” if you don’t want to wait for the page to be processed. SnapAI will be disabled for that page.
Snap Modes
SnapAI supports 3 different “snap” modes:
- Snap Point Mode- As the user moves the mouse, points detected will be displayed in the sensing circle as a solid gold point.
- Snap Line Mode- As the user moves the mouse, the closest line segment is highlighted using the current trace line color.
- Snap Polyline Mode- This works the same way as Snap to Line except that if the closest line is a polyline, all points in the polyline are added to the measurement.
The user can toggle SnapAI on/off by pressing Ctrl+S while taking off a measurement. While Snap is on, the user can toggle between Snap modes by pressing the left and right arrow keys or the Tab and Shift+Tab keys.
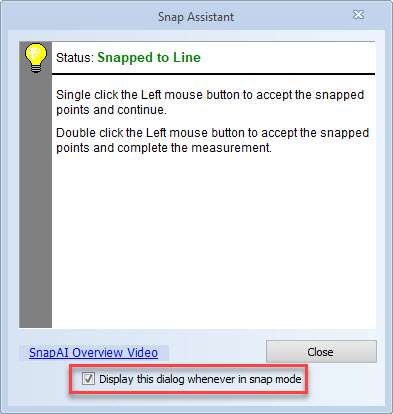
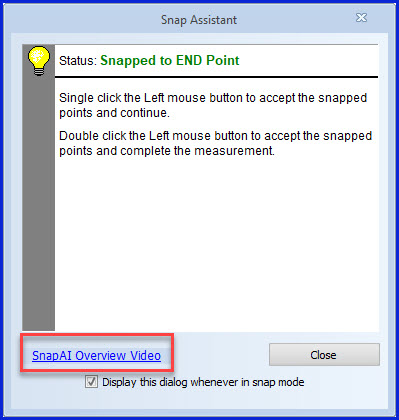
The Snap Assistant hint box will appear while Snap is on during the takeoff of a measurement. Snap Assistant instructions will change accordingly as the user performs takeoff. To turn the Snap Assistant off, uncheck the “Display the dialog whenever in snap mode” box. To turn the Snap Assistant back on, click on Settings/User Preferences/HintsTab and check the box, “Show hint window when snap is enabled”.
Snap Point Mode
Snap to Point mode detects points in vector PDF files. When the user is in Snap to Point Mode, a sense indicator appears by the cursor. As the user moves the mouse, one of 3 scenarios will happen:
-

The sense indicator will be comprised of dots to form a circle if there are no points detected. -
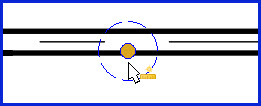
The sense indicator will be comprised of dashed lines to form the circle with a gold dot If it detects a point on a line. -
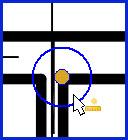
The sense indicator will be comprised of a solid line to form the circle with a gold dot if it detects an endpoint of a line. This allows the user to quickly & accurately take off areas, lines, perimeters and counts without having to zoom in or fidget with the mouse to land on the exact points; the program finds the exact points for the user.
Snap Line Mode
Snap to Line mode detects lines in vector PDF files. When the user is in Snap to Line Mode, a sense indicator appears by the cursor. As the user moves the mouse, one of 3 scenarios will happen:
-

The sense indicator will be comprised of dots to form a circle if there are no lines detected. -

The closest line segment is highlighted using the current trace line color. An arrow appears to display the direction of the line. The gold box indicates the beginning of the line and a gold dot indicates the end of the line. To switch directions, the user needs to move the mouse after or before the halfway point of the line.
- NOTE: To take off an area that has a positive value, make sure you measure in a clockwise direction. To take off an area that has a negative value (i.e. “cut-out” part of an area), measure in a counter-clockwise direction.
-
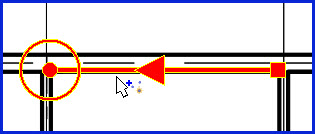
While in Snap Line Mode, retracing a line in the current measurement is not permitted. A red line will appear, and the Snap Assistant will warn the user.
Snap Polyline Mode
Polylines are a set of logically connected lines.Snap to Polyline works the same way as Snap to Line except that if the closest line is a polyline, all points in the polyline are added to the measurement. As the user moves the mouse, one of 4 scenarios will happen:
-

The sense indicator will be comprised of dots to form a circle if there are no lines detected. -

The closest line segment is highlighted using the current trace line color. An arrow appears to display the direction of the line. The gold box indicates the beginning of the line and a gold dot indicates the end of the line. To switch directions, the user needs to move the mouse after or before the halfway point of the line.
- NOTE: To take off an area that has a positive value, make sure you measure in a clockwise direction. To take off an area that has a negative value (i.e. “cut-out” part of an area), measure in a counter-clockwise direction.
-
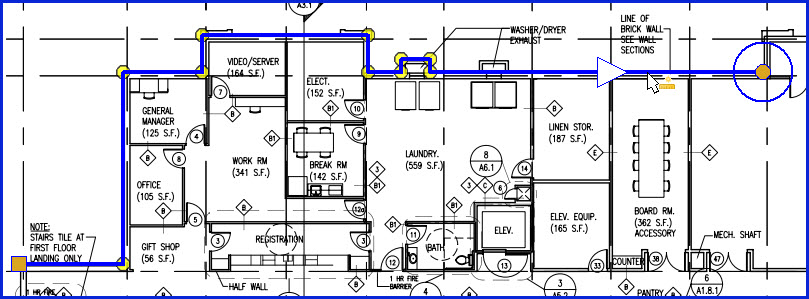
The closest polyline segments are highlighted using the current trace line color. An arrow appears to display the direction of the line. The gold box indicates the beginning of the polylines and a gold dot indicates the end of the polylines. To switch directions, the user needs to move the mouse after or before the halfway point of the end of the polylines.
- NOTE: To take off an area that has a positive value, make sure you measure in a clockwise direction. To take off an area that has a negative value (i.e. “cut-out” part of an area), measure in a counter-clockwise direction.
-

While in Snap Polyline Mode, retracing a line in the current measurement is not permitted. A red line will appear, and the Snap Assistant will warn the user.
Best Practices using SnapAI
SnapAI only works with vector PDF files and only with a Premier license. If the user loads a non-vector PDF file, SnapAI will be disabled.
Because not all vector PDF files are alike and Architects DO NOT typically create the PDF with the estimator in mind, SnapAI may work very well with some PDF files, but not others. The trick is to get familiar with how the different SnapAI modes sense points, lines and polylines on the drawing and use all three modes interchangeably to perform your takeoff efficiently.
eTakeoff recommends the Best Practices below to take the most advantage of the powerful SnapAI tool.
- When you first open a new drawing:
- Turn on SnapAI
- If SnapAI is disabled, the drawing is most likely a Non-Vector file
- Or, the user does not own a Premier license
- With SnapAI On
- Double click on a trace that you need to measure with
- Notice that the Snap Assistant Window
pops up which has instructions that change accordingly as the user
performs takeoff. It also has a link to a SnapAI Overview Video which we strongly
recommend for new users to preview.
- Click on the “Snap Point” button
- Move the mouse over the drawing noticing where the sense indicator turns to a solid circle which means that it found a vector end point
- Press the right & left arrow keys or the Tab and Shift+Tab keys to toggle the Snap mode between Point, Line and Polyline
- Continue to move the mouse over the drawing noticing where
SnapAI detects line vectors and polyline vectors accordingly.
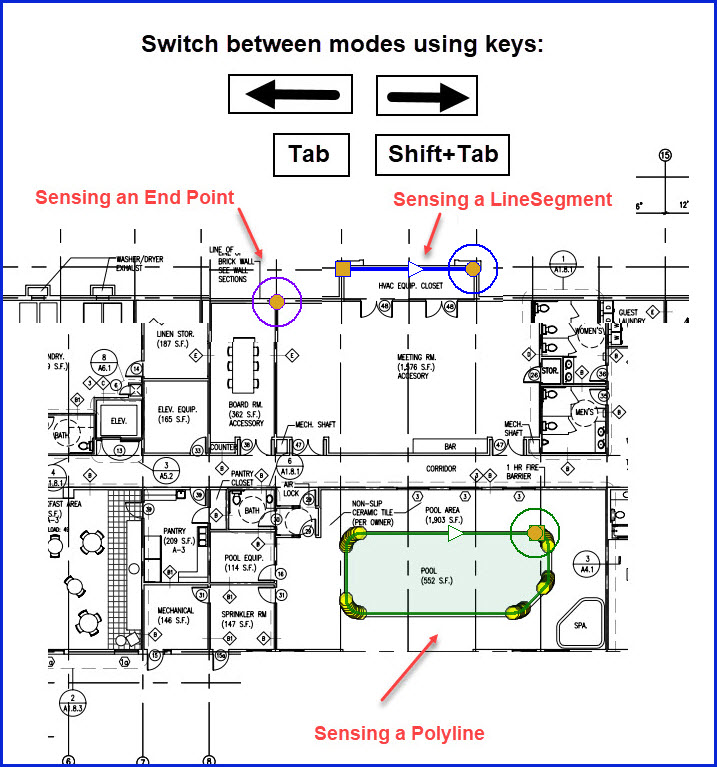
- Be careful not to waste too much time looking for polylines or the perfect connected lines! Certain PDF vector files have overlapping vector lines or underlying vector data which makes Snap to Line or Snap to Polyline difficult for practical use.
- Switch to Point Mode as a fall-back if you think you’re spending too much time finding lines or polylines. Point mode makes it easy to find corners and points with the solid sense indicator circle.
