
Ribbon Bar Quick Access Toolbar

The Quick Access Toolbar can be displayed to the right of the File Menu button or underneath the ribbon bar. This menu is highly customizable and can be used to provide access to commonly used buttons not matter which tab is displayed.
Default Configuration
The default configuration of the Quick Access Toolbar includes the following buttons:

Undo Last Change
To undo the last change made to a measurement, simply press this button. You can press the button multiple times to undo multiple changes. Undo works on the following changes:
- Adding points (connected or disconnected)
- Editing points
- Changing the trace (by editing or selection)
- Editing the description

Cancel Changes to Measurement
Press this button to cancel all changes to the measurement you're working on.
If you are adding a new measurement, it will be deleted. If you are
making changes to an existing measurement, all changes made since
you selected it will be reversed.
Shortcut: You can also cancel all changes to the measurement
by pressing the Escape key.

Select Measurement or Annotation
To select a measurement or annotation, press this button, then click on the desired measurement or annotation. The selected measurement or annotation will display yellow circular selection symbols for all points. This button will look like it is "down" whenever you are in select mode. Shortcut: You can switch to select mode by pressing the "Enter" key or the "S" key.

Select Multiple Measurements and/or Annotations
To select multiple measurements and/or annotations, press this button, then click on the
desired measurements or annotations. If you click on a measurement that is
already selected, it will be de-selected.
You can also select by dragging a rectangle around the desired measurements
and/or annotations. Press the left mouse button down on one corner of the selection
rectangle, drag the mouse to the opposite corner, then release the left mouse button.
Any measurements or annotations that fall entirely inside the rectangle that were
not previously selected will be selected. If everything inside the rectangle
was already selected, they will be de-selected.
The selected measurements and/or annotations
will display yellow circular selection symbols for all points.
This button will look like it is "down" whenever you are in multiple-select mode.
This feature is available with Pro-Plus, Advanced,
Premier and the Drawing Compare Add-on.

Edit Description
You can add descriptive text to annotations. This text will appear in
the "tool tips" displayed when the mouse is paused over the annotations.
To add or edit the description for the annotation you're working on,
press this button. The Description Edit Window
will appear. Type in the desired text, then press the Enter key.
If you want to start a new line in the text, hold the Shift key
down while pressing the Enter key.
Press the Escape key to cancel description editing
This button will be disabled in the Basic Viewer.

Print current drawing...
Select this menu option to print the current drawing. When you select it, the Print Drawing Dialog is displayed. Complete the information in this window and press OK to print part or all of the drawing.
Modifying the Quick Access Toolbar
One of the most powerful features of the Quick Access Toolbar is that you can modify it to include buttons from any tab of the ribbon bar. The Toolbar is ALWAYS visible so it makes those commands available no matter which tab is displayed.
You can display the configuration window in any of the following ways:
- Press the down-arrow button at the right end of the Quick Access Toolbar and select "Customize Quick Access Toolbar" from the menu.
- Right-click to the right of the Ribbon Bar tabs and select "Customize Quick Access Toolbar" from the context menu.
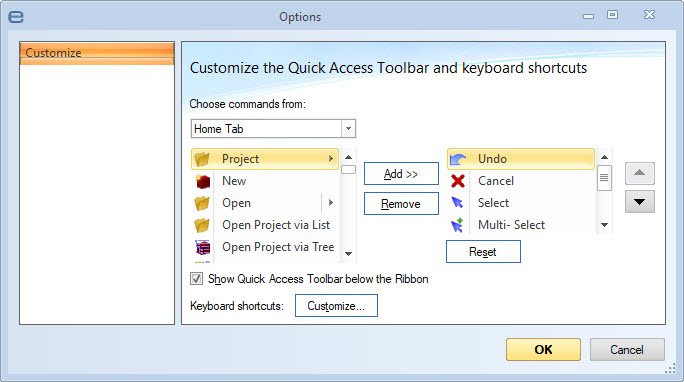
The Ribbon Bar Options Window will be displayed with "Customize" selected in the left-hand list and the configuration dialog displayed on the right.
You can drag the edges or corners of the Options Window to make it larger or smaller.
To add a button to the toolbar, do the following:
- Using the drop-down list "Choose commands from:", select the tab containing the desired button.
- Select the desired button in the left-hand list.
- In the right-hand list, select the button above which you want the new button inserted.
- Press the "Add >>" button to add the desired button to the toolbar.
To remove a button from the toolbar, select it in the right-hand list and press the "Remove" button.
You can reposition a button within the toolbar by selecting it in the right-hand list the pressing the up/down arrow to the right of the right-hand list.
When you have finished editing the toolbar, press the "OK" button to save your changes. Pressing the "Cancel" button will discard your changes.