Item Assignment Toolbar
The Item Assignment Toolbar is used to assign measurements and annotations to the Quantity Worksheet . Use the Main Toolbar to show or hide the Item Assignment Toolbar
Note: You can also assign measurements and annotations by dragging them to the Quantity Worksheet Window and dropping them.
Item Selection Control
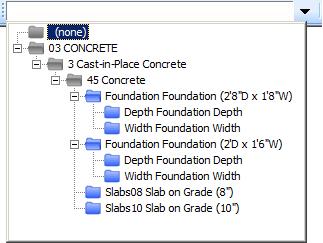
The item selection control shows the worksheet item branch
in an edit box with a down-arrow button to its right.
If no branch has been selected, the control will be blank.
The picture shown here doesn't show the full width.
To assign measurements or annotations to the worksheet, first select
the desired branch by pressing the down-arrow button, the selecting
a branch from the item tree. The tree only includes branches that
allow assignment or whose sub-branches allow assignment.

The figure above shows the item tree displayed when the down-arrow
is pressed. Branches that allow assignment have a light blue folder.
Those that don't have gray folders.
You can change the size of the tree by dragging the right or bottom edges
Automatic Assignment Checkbox
The automatic assignment checkbox is a checkbox with the words
"Auto-assign" to the right.
The picture shown here doesn't show the full width.
If this box is checked, new measurements and annotations will be
automatically assigned to the selected worksheet item branch.
You should check or uncheck the box as desired before adding the
first point to the new measurement or annotation.
This checkbox will be disabled if no worksheet item branch has been selected.
One-time Assignment Button
Press this button to assign the measurement or annotation you're working on to the currently selected worksheet item branch. This button will be disabled if no worksheet item branch has been selected or if the current measurement or annotation has already been assigned to the selected branch.
