
Drawing Import Name Mapping Window
This window is the second step in the drawing import process. It is used to specify how the drawing filename, sub-folder and description will be determined.
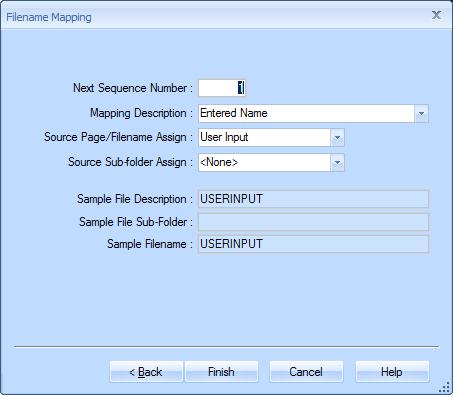
Figure 1: The Name Mapping Window
In theory, we could enter the description, filename and sub-folder for each drawing. But in most cases this would require repetitive user input. For example, let's say we wanted to put the folders for different disciplines in different sub folders. So the "Interior Elevations" drawing would have a filename of "Interior Elevations.tif" and would go in the "Architectural" sub-folder. The drawing description is used in the Dimension drawing list which is sorted alphabetically. So if we wanted that list grouped by discipline, the drawing description should be "Architectural - Interior Elevations".
Rather than enter the duplicate information, we enter the two pieces of unique information and build the filename, sub-folder and description from those pieces. In this example we would enter the drawing title and the discipline.
This is implemented by defining "Name Mappings". Standard Name Mappings are defined in advance. In this dialog, you can select a pre-defined name mapping and override the automatic assignments for the mapping.
Next Sequence Number : - You can also set the starting sequence number for drawings. Drawing names and descriptions frequently start with or use a sequential number. When working with a Dimension project, the last sequence number used is remembered. You can override the starting sequence number.
Mapping Description : - This combo box provides a list of Standard Filename Mappings. When you select a standard mapping from this list, the automatic assignments and sample fields are displayed.
Source Page/File Name Assign: - Frequently the files being imported will have file or page descriptions that match one of the desired output fields. This combo box allows you to automatically assign the description to one of the input fields. Simply press the down-arrow button and select the desired input field.
Source Sub-folder Assign: - Frequently the files being imported come from a sub-folder that matched one of the desired output fields. This combo box allows you to automatically assign the sub-folder to one of the input fields. Simply press the down-arrow button and select the desired input field.
Sample File Description : - This is a sample of the description of the file in the Dimension project. If you are not importing to a Dimension project this isn't used. The sample is based on the selected name mapping. In Figure 1, the formula is the three digit sequence number followed by the input field "User Input" followed by the input field "Discipline" inclosed in parentheses. The actual description will depend on the values you enter in the input fields for each drawing.
Sample File Sub-folder : - This is a sample of the subfolder where the output file will be placed. The sample is based on the selected name mapping. In Figure 1, the formula is the input field "Discipline".
Sample File Name : - This is a sample of the filename of the output file. The sample is based on the selected name mapping. In Figure 1, the formula is the three digit sequence number followed by the input field "User Input".
Back - Press this button to go back to the Output Folder/Project Window and make changes.
Next - When you have completed the filename mapping information, press this button to proceed to the Drawing List Window and begin selecting files to import.
Cancel - Press this button to cancel the import process.