
Project Management Overview
Overview
Dimension allows you to work with a stand-alone drawing without saving any information. But most construction projects consist of multiple drawings. Dimension recognizes that and organizes drawing files in a Dimension "Project". If you want to save any information about a drawing, the first step is to make the drawing part of a project.s When a drawing is part of a project, you get the following benefits:
- The scale for the drawing is remembered.
- The last view of the drawing is remembered.
- You can quickly switch from drawing to drawing within a project.
- In the advanced versions of Dimension, measurements can be accumulated from multiple drawings to calculate project totals.
Creating a project is easy. The main task is to select a folder for the project. This folder and its subfolders should contain the drawing files for the project. We'll cover project creations in detail later.
When working with projects, you can use the Project Toolbar to quickly move from project to project and from drawing to drawing within a project. More on that later too.
Over time, you will create lots of projects. Think about how many projects you estimate in one month and how many you'll have in a year. It could be hundreds or even thousands. At that point, project organization becomes critical. With the effective use of a hierarchy of folders and the project import/export capabilities of Dimension; you can handle thousands of projects.
The Project Folder
The project folder is simply a folder that contains the drawing files for the project. You're not required to put all the drawings in the project folder but it simply works better:
- It's easy to backup, restore or delete the project.
- You can use Dimension's scanning feature to automatically add the drawings to the Dimension project.
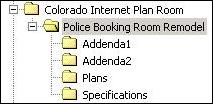 For more complex projects, the drawings files may be stored
in sub-folders within the project folder. For example you
might have separate folders for plans, specifications and
addenda. It's important not to set up one project folder
within another project folder.s
For more complex projects, the drawings files may be stored
in sub-folders within the project folder. For example you
might have separate folders for plans, specifications and
addenda. It's important not to set up one project folder
within another project folder.s
We'll delve deeper into organizing project folders later.
How and when you set up the project folder will depend on how you receive the plan files. For plans you scan from paper or receive on CD, via email or via an FTP site; you will need to manually create the project folder and copy the files into the folder. Note: You can view drawings on a CD using Dimension but you can't set up project folders on your CD drive. The project folder would disappear as soon as you eject the CD.
The overall steps are:
- Manually create the project folder.
- Copy the files to the folder.
- Create a Dimension project, identifying the project folder.
- Dimension will automatically scan the project folder (and any sub-folders) and add the drawing files to the Dimension project.
When working with an electronic planroom that's integrated with Dimension, the process is even easier:
- Working within the electronic planroom, use Dimension to preview plans until you decide you want to create a Dimension project.
- Choose File/Save from the Dimension menu.
- Dimension will prompt you to set up the project and the project folder. Because Dimension is integrated with the planroom, much of the project information is transferred automatically.
- Specify the project folder. Dimension will create it for you.
- The file you're viewing will be automatically added to the project. You can configure the project so that any drawing file you view for the project will be automatically saved in the project folder and added to the project.
Dimension Import is a separate utility that simplifies the process of renaming drawing files. It can automatically create a project folder, copy files into the folder, create a Dimension project and add the drawing files to the project. We won't cover Dimension Import in this document.
Creating a Dimension Project
With an Existing Project Folder and Drawing Files
As described above, when you have plans from scanning, a CD, etc., the project folder is created and the files are copied to it before the Dimension project is created.
When you're ready to create the Dimension project, press the "New Project" button on the Project Toolbar (outlined in red below).

The standard Windows Folder Selection Dialog will be displayed.
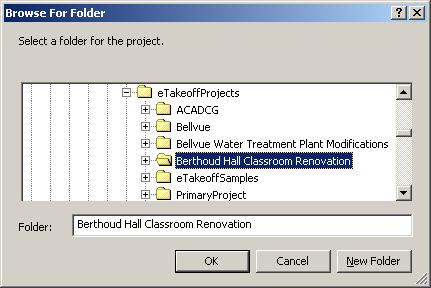
Select the project folder previously created and press "OK". The Project Properties window is then displayed.
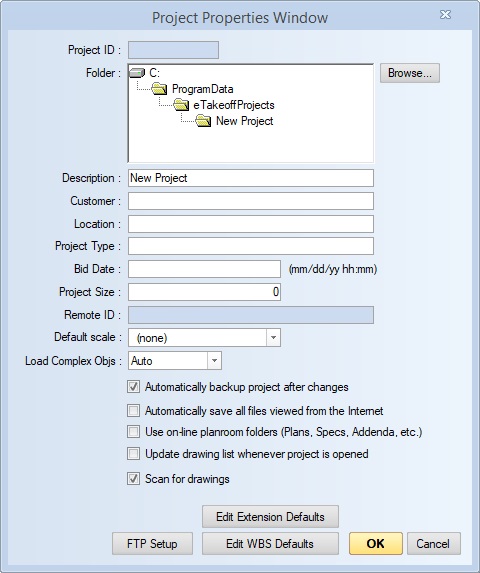
Automatically save all files viewed from the Internet - If you check this box, then any time you download a drawing from the Internet that is part of this project, the drawing file will be saved in the project folder and the drawing will be added to the project.
Scan for drawings - If you check this box, Dimension will scan the project folder (and its sub-folders) for drawing files. A list of the files will be displayed and you can check the ones you want to add to the project.
With an Integrated Planroom
As described above, creating a project when working with an integrated planroom is easy. While viewing a downloaded drawing select File/Save from the main menu (or press the "Save" button on the Project Toolbar.
The Project Wizard Window will be displayed. Initially the second page of the wizard will be displayed:
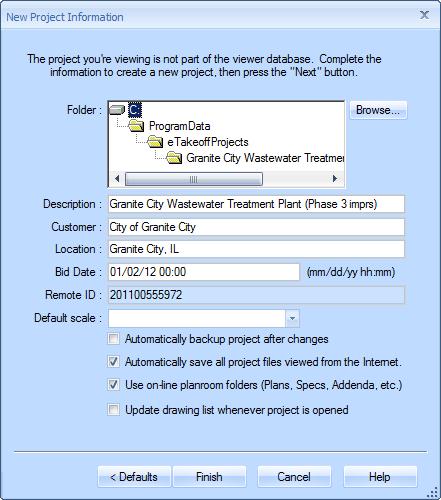
The folder is initialized to use the project description (from the planroom) as the name of the project folder and places that folder at the top of the Dimension folder hierarchy. As we discussed above (and will discuss further), you will probably use a more deeply structured folder hierarchy and won't use this default. You can press the "Browse." button to select a different folder.
The project description is initialized with the description from the planroom. You can set a default scale for this project's drawings.
Automatically save all files viewed from the Internet - If you check this box, then any time you download a drawing from the Internet that is part of this project, the drawing file will be saved in the project folder and the drawing will be added to the project.
When you've completed this step of the Project Wizard, press the "Finish" button to create the project.
The Project Toolbar
Now that you've created a project, the project toolbar lets you switch from project to project (discussed later), switch from drawing to drawing within the project, switch from page to page within a drawing and perform other tasks. The Dimension Help describes the toolbar in detail. We'll just look at a few key features.
First, let's look at switching drawings. This involves the drawing description, drawing list and drawing tree.

The drawing description displays the name of the drawing currently being viewed.
The Drawing List
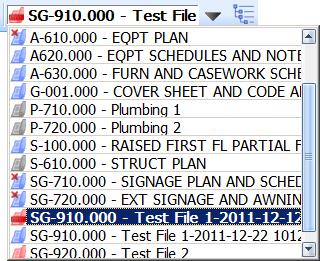 The down-arrow button to the right of the description will
display a list of all the drawings in the project.
The down-arrow button to the right of the description will
display a list of all the drawings in the project.
The list can be re-sized by dragging the left or bottom edge. If the window isn't tall enough to display all the drawings a vertical scroll bar will be shown. This list is the quickest way to switch drawings when there are just a few drawings in the project.
The Drawing Tree
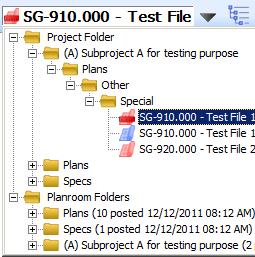 For more complex projects (with drawings in sub-folders)
it may be easier to pick drawings using the drawing tree.
To display the tree, press the tree button to the right of
the down-arrow button.
For more complex projects (with drawings in sub-folders)
it may be easier to pick drawings using the drawing tree.
To display the tree, press the tree button to the right of
the down-arrow button.
The top branch of the tree displays the folders common to all drawings in the project. Typically this will be the project folder.
Beneath that the drawings are organized by folder.
The Project Description, List and Tree

The Project information part of the toolbar is organized the same way as the drawing information. The current project is displayed in the description. The down-arrow button displays the project list. The tree button to the right of the down-arrow button displays the project tree. Projects in the tree are organized by their project folder.
The project list provides a quick and easy way to switch from project to project when you have just a few projects in Dimension. But it's not practical when you have hundreds of projects.
 The project tree will handle hundreds of projects if the
project folders are well structured. The default folder
for a project is to put it directly under the DimensionProjects
folder. But if you put hundreds of project folders in that folder,
it's no easier to use than the list. The project folders need
to be organized in a multi-tiered hierarchy (folders
containing folders containing folders).
The project tree will handle hundreds of projects if the
project folders are well structured. The default folder
for a project is to put it directly under the DimensionProjects
folder. But if you put hundreds of project folders in that folder,
it's no easier to use than the list. The project folders need
to be organized in a multi-tiered hierarchy (folders
containing folders containing folders).
The best hierarchy for your organization will depend on the nature of your projects. You want to use a hierarchy so that you'll know where in the hierarchy a particular project belongs. Here are some suggestions:
- Customer. Owner or General Contractor - This is practical if you do a lot of work for a limited group of customers.
- Location - This works well when you have clearly defined locations like states or metropolitan areas. It may be harder to remember which county a project was in.
- Type of project - This works for splits like residential, commercial, public or offices, hospitals, retail. Then there's the inevitable "mixed-use" facility.
- Date - This can work well if you're consistent. Use the bid date or the estimate creation date but be consistent. Don't create too many folders. If you break it down by month or quarter, you can probably find a project after looking in just one or two folders. But if you break it down by week, you may have no idea where to start looking. Dates usually work best as a low level breakdown although some of our clients have used the year as a top level breakdown. This has the advantage of automatically getting old projects out of the way.
When you're considering what breakdowns to use, recall a few projects from previous years. Then think about what characteristics of those jobs you clearly recall. Think about what hierarchies would work most effectively. Ideally each breakdown would have twenty or fewer categories.
WARNING! DON'T CHANGE FOLDERS FOR PROJECTS THAT ARE IN DIMENSION. Dimension won't be able to find the drawing files if you move them.
Project Exporting and Importing
The hierarchies described above allow you to effectively use the project tree with hundreds of Dimension projects. However the project list will be totally unusable.
If you think about the way you work with projects, there are probably very few you work on within a given period of time. Wouldn't it be nice to have the list contain just the projects you're working on, with some quick way to add and remove projects from the list? Project Exporting and Importing can be used to do just that.
Dimension keeps a single database with all the information about all Dimension Projects. The project list and tree display all those Dimension projects. Exporting a project takes all the information for that project and exports it into a file. By default, this export file in placed in the project folder.
When you want to take a project off the list, simply export it, then delete it. (Don't delete the drawing files!) Should you want to look at it again, just select "Project Import" from the File menu, navigate to the project folder and select the export file. Your project will be added back to the list with all information restored.
Note: Once you export a project and delete it from Dimension, you can move or rename the project folder. When you import the project, Dimension will use the new folder.
Other Uses for Export/Import
You can use Export as a simple way to save the state of an estimate at any given point in time. For example, if you receive major drawing revisions for a project you might want to save a copy of the estimate before the changes. Simply export the project and give the export file a name that identifies the project state. Then you'll have that version to come back to if you need it.
You can also use export and import to share projects with others who have Dimension. Export the project to the project folder and send the project folder to the other Dimension user. They simply import the project.
Backing Up Your Projects
Sooner or later, your computer will crash, die, get stolen or encounter some other fate that wipes out all the information it contains. Pretend that just happened right now.
Do you have a "backup" copy of your Dimension information? Don't worry about the Dimension program; we've got copies of that. What about all the project's you've estimated? If you don't, you're going to have to recreate any estimate you need. Don't you wish you'd made a copy? Ok, we're just pretending your computer crashed. You've still got time to copy your project information. But you better do it. Sooner or later you'll need it.
If you have a high-volume backup device such as a tape drive, you can simply backup the DimensionProjects folder (and its subfolders). If your project folders are organized in a hierarchy under that folder, you'll have everything.
If you don't have a high-volume device, you can back up individual projects by exporting the project to a file in the project folder, then backing up that folder. You can back up to a CD drive or a network server, or even zip up the folder and email it to a different computer.
There's a saying in the computer business: "You can learn about backup the easy way or the hard way. No one learns the easy way".
Do yourself a favor, disprove that saying.