
Drawing Import Convert Window
This window is displayed for each drawing to be converted. Conversion takes a source file (or a page in source file) and creates an output drawing file. It also (optionally) adds the drawing to a Dimension project.
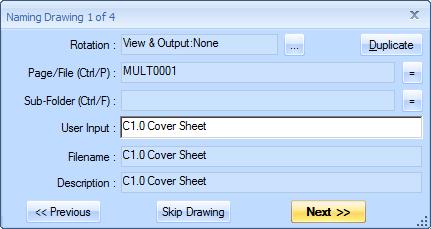
Figure 1: The Conversion Window
Figure 1 shows the conversion window with all possible input fields shown (User Input, Discipline, Location, Prefix and Location). The actual input fields displayed will depend on the name mapping selected in the Name Mapping Window. Only the fields used in the name mapping will be displayed.
When the first drawing's information is displayed in the conversion window, The drawing itself will be displayed in the Dimension Import Main Window. You will probably need to rotate, zoom or scroll the main window to view the title block. You can do that by clicking on the window, then zooming or scrolling using the mouse, scrollbars, etc. As you progress from drawing to drawing, the next drawing will automatically be rotated, zoomed and scrolled to match the previous drawing. In most cases, this will put the title block in view.
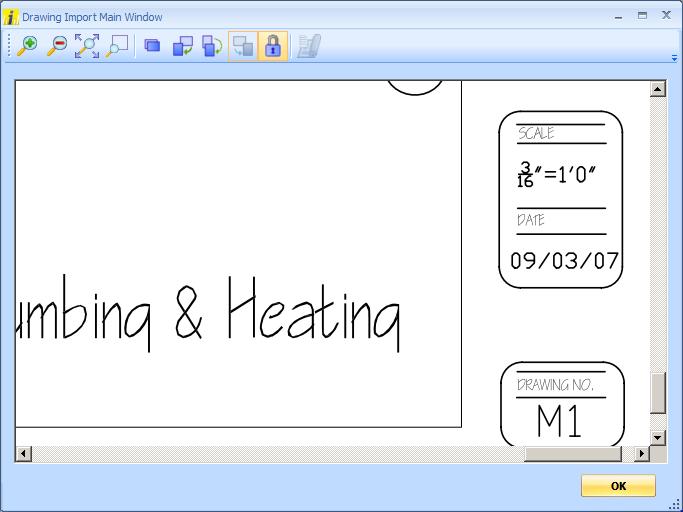
Figure 2: Drawing Display in Main Window
Figure 2 shows the main window zoomed and scrolled so that the title block in view. But the drawing needs to be rotated to make the title block more readable. The output drawing may also need to be rotated (this isn't the case in figure 2). The rotate button is set both rotations.
Rotation : - The rotation button is to the right of the rotation display with the label "...". Pressing this button will display the Conversion Rotation Window. In this window you can set the rotation for viewing and for output.
With the zoom, scroll and rotation set, the next step is to enter the fields that the mapping uses to generate the output description, filename and sub-folder. As you type in these fields, the Filename, Sub-Folder and Description fields are updated automatically.
Drawing Information Fields
Page/File (Ctrl/P) : - This field displays the page description (if there is one). Some files have descriptions for each page. If no page description is available, it displays the name of the file (without path or extension).
Frequently the description is the same text desired for the User Input or one of the other input fields. In this case you can use the shortcut key Ctrl/P to transfer the description to the input field that has the focus.
The "=" button to the right of the field allows you to "auto-assign" the description to one of the input fields. If auto-assign is set, each time a drawing is loaded, the descrpition will automatically be transferred to the auto-assign field. Simply press the "=" button and select the desired field.
Sub-Folder (Ctrl/F) : - This field displays the sub-folder that the file name from. Sub-folders only exist when you select files by folder and files are stored in sub-folders below the selected folder.
Frequently the sub-folder is the same text desired for the User Input or one of the other input fields. In this case you can use the shortcut key Ctrl/F to transfer the sub-folder to the input field that has the focus.
The "=" button to the right of the field allows you to "auto-assign" the sub-folder to one of the input fields. If auto-assign is set, each time a drawing is loaded, the sub-folder will automatically be transferred to the auto-assign field.
Input Fields
All the input fields support prompting. Prompting allows you to define commonly used terms such as "Architectural" or "Electrical" as standard prompts. When you are entering the Input Fields, you can type the first few characters of a prompt and have the rest entered automatucally. For more information on prompts, see Prompt Windows.
User Input : - This is the primary field that is unique to each drawing. It is almost always mapped to be part of the Filename and Description. If you do wish to duplicate the User Input from the previous drawing, simply press the Duplicate Button or hold down the "Alt" key and press the "D" key.
Discipline : - This field is usually used to specify the construction discipline such as "Architectural" or "Electrical". It is automatically duplicated from drawing to drawing so that if your drawings are sequenced by discipline, you only have to enter it when it changes.
Location : - In large projects, this field is usually used to specify the location such as "Building 1" or "Building 2". It is automatically duplicated from drawing to drawing so that if your drawings are sequenced by location, you only have to enter it when it changes.
Prefix : - This is a generic field that can be used to specify a name, folder or description prefix. It is automatically duplicated from drawing to drawing so that if your drawings are sequenced by the prefix, you only have to enter it when it changes.
Version : - This field is usually used to specify the version of a drawing such as "Addendum 1" or "Addendum 2". It is automatically duplicated from drawing to drawing so that if your drawings are sequenced by the prefix, you only have to enter it when it changes. In many cases, the version will only need to be entered for the first drawing and can then be reused for the entire import.
Mapped Fields
The fields below are computed automatically from the name mapping selected in the Name Mapping Window. They are updated instantly as the Input Fields change. They can't be changed directly.
Filename : - This is the filename of the generated drawing file without the path name or extension.
Sub-Folder : - This is the sub-folder of the generated drawing file within the Project Folder or Root Folder selected in the Output Folder/Project Selection Window.
Description : - This is the description of the drawing file within Dimension. The primary use of the description is in the drop-down list of drawings used to jump from drawing to drawing. If the same drawing name is used in different folders (for different versions, locations, etc.), you want different descriptions for the different files. So while the filename might be "West Elevation" for multiple files, you would want the description to be "Building 1 - West Elevation" or "West Elevation - Addendum 2".
Buttons
Duplicate
- Press this button to duplicate the User Input from the previous drawing to the User Input for the current drawing. You can edit the User Input after duplicating. You can invoke this button from the keyboard by holding down the "Alt" key then pressing the "D" key.<< Previous - Press this button to discard any input for the current drawing and go back to the previous drawing. If a converted drawing file was generated for the previous drawing, it will be deleted. This is effectively an "Undo" of the conversion of the previous drawing.
Skip Drawing - Press this button to skip conversion for the current drawing and proceed to the next drawing. You will first be asked to verify that you wish to skip the drawing. To bypass the verification, hold down the "Shift" key while pressing the button.
Next >> - When you have completed all the input fields, press this button to convert the current drawing and begin work on the next drawing.
Resizing the Window
This window is resizable. You can change its size with the mouse by clicking and dragging an edge of the window or the "grabber" control in the lower-right corner of the window.