This capability requires Dimension Premier or the Extensions Add-on.
This document describes joist extensions. Joist extensions have all the functionality of normal (formula) extensions, plus they calculate and display a series of parallel members inside the measurement. The Joist extension can be used for more than joists. Any measurement that needs a layout of parallel members can use it. For example, beams, rafters and rake walls. The following parameters can be specified for a joist extension:
- The on-center distance between the members
- The length multiple the members should be rounded up to.
- The pitch of the members. This is used when laying out members on a sloped surface such as a roof.
- The orientation point for the members (horizontal and vertical)
- The rotation of the members
- Individual members can be added or removed
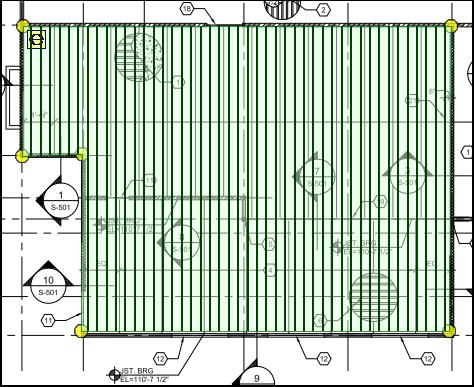
Figure 1: Sample Joist Extension
The members are drawn using the point color and twice the line thickness.
Creating Standard Joist Extensions
If no standard joist extensions exist, you can create a joist extension using Standard Extension Maintenance. Simply press the “Add” button in the Standard Extension List Window and select “Joist” from the context menu. The Standard Extension will be displayed with three rows predefined.
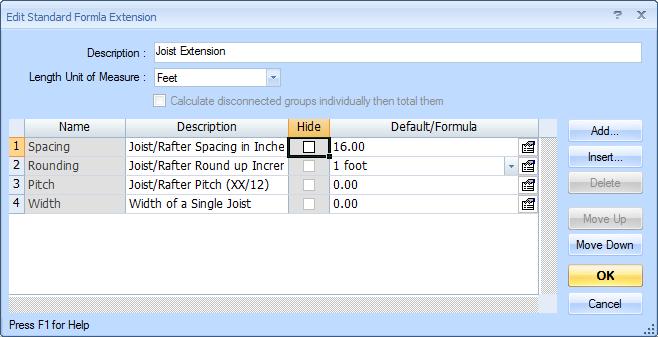
Figure 2: Joist Standard Extension Maintenance
The three pre-defined rows are:
- Spacing – This on-center distance between the members.
- Rounding – This is the rounding increment used to determine the member length to order. It can be 1 foot or 2 feet. For example, if the span length were 10.5 feet, with 1 foot rounding the order length would be 11 feet. With 2 foot rounding in would be 12 feet.
- Pitch – This is used to when the joist is laid out over a sloped surface such as a roof. The pitch of the surface is the amount of rise (vertical change) for each 12 units of run (horizontal change). For flat surfaces the slope should be zero.
WARNING: The slope is applied to joist member length. That assumes the surface is sloped from one end of the members to the other. - Width – This is the width of an individual joist. It’s used to clone joist members (see below).
NOTE: The Width row was added in release 3.2. Joist extensions created prior to that will not include it. It will be automatically added the next time you edit the extension. (Be sure to edit the properties of the added row.)
The name and position of the predefined rows can’t be changed. Otherwise, the information can be edited as described for Standard Extension Maintenance.
- Description – For Spacing, the description should be changed to reflect the unit of measure.
- Default/Formula – The advantage of specifying a default is that you don’t have to specify the value for each measurement using the standard extension. The disadvantage is that if you may forget to change the value when you want something other than the default.
- Decimal Places (in the Properties Window) – You can change this for Spacing and Pitch.
- Unit of Measure (in the Properties Window) – This should NOT be changed.
- Minimum and Maximum (in the Properties Window) – These can be set to catch entry errors. For example, Spacing might have a minimum of 16.00 to keep someone from accidentally entering a value in feet.
Other rows can be added after the predefined rows. These rows can use formulas with any of the measurement values (Area, Count, Length, Perimeter) or the predefined rows (Spacing, Rounding, and Pitch) or any of the following calculated values:
- Count_XX_Foot – The number of members of length XX used to cover the measured area, where XX is from 01 to 60. For example, Count_12_Foot would be the number of 12 foot members.
- Count_Total – The number of members.
- Length_Total – The total length of members required (after rounding).
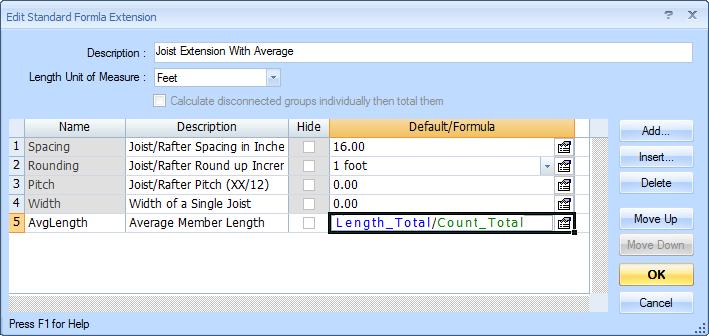
Figure 3: Standard Joist Extension with Additional Calculations
Editing a Measurement’s Joist Information
The formula part of a joist extension can be edited the same way as other extensions. This is described in Extension Measurement Maintenance. You can also move and rotate the joist layout. To start this, right click on the measurement and select “Edit Extension” from the context menu. Then select “Move/Rotate Layout and Edit Joists…” from the sub-menu. The Move/Rotate Toolbar will be displayed over the measurement as shown in figure 2.
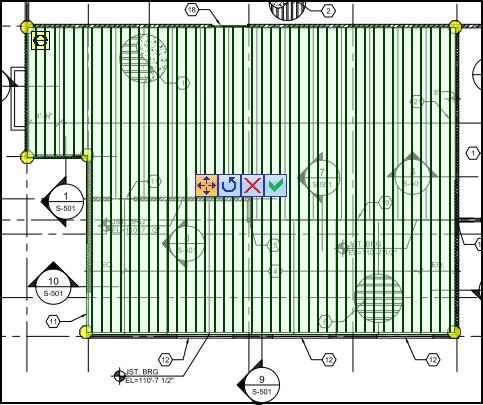
Figure 4: Sample Joist Extension with Move/Rotate Toolbar
The toolbar has four buttons:
 Move Button – Click this button to begin moving the joist members. The button color and the cursor will change to indicate that you are in move mode. Then click down anywhere and drag the joist members left, right, up and/or down.
 Rotate Button – Click this button to begin rotating the joist member alignment. The button color and the cursor will change to indicate that you are in rotate mode. Then click down anywhere and drag clockwise or counter-clockwise to rotate the joist. If you hold down the Shift key while you are rotating, the angle will be set to a multiple of 7.5 degrees (7.5, 15.0, 22.5, 30.0, etc.). To set the rotation to a multiple of 90 degrees, right-click on the rotate button and select the angle from the context menu.
-
 Cancel Button – Press this button to discard any move or rotation changes and dismiss the toolbar.
  OK Button – Press this button to save any move or rotation changes and dismiss the toolbar.