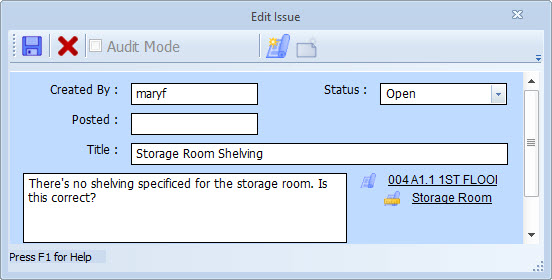
Issue Edit Window
This document describes use of the Issue Edit Window. It assumes that you are already familiar with issues in general. If not, we suggest you read the Issues Overview.
The Issue Edit Window displays the information about a single issue. It can be invoked in four ways:
- Selecting “Create an Issue…” from the Main Window Context Menu.
- Selecting “Existing Issues” from the Main Window Context Menu then selecting an issue from the sub-menu.
- Pressing the “Add” button in the Issue List Window.
- Pressing the “Edit” button in the Issue List Window.
Basic Issue Information
We’ll discuss the button across the top of the window below. First lets go through the information kept about an issue.
Created By – This identifies the person who started the issue. In most cases it is set to the User ID defined in the User ID Window and can be changed manually.
Status – The status of an issue can be Open, Resolved or Critical.
Posted – This field is reserved for future development.
Title – The title should be a brief description of the issue. It is displayed in the Issue List.
Notes – The large input area is for notes. This multi-line edit field should be used to describe the details of the issue.
Assignments – The drawing, measurement and annotations assigned to the issue (if any) are displayed as links to the right of the notes area. You can click on these links to display and select the assigned object. Measurements and annotations can be assigned to an issue by dragging and dropping them from the Main Window to the Issue Edit Window. The drawing currently displayed in the main window can be assigned to the issue by pressing the “Assign Drawing” button. To remove an assignment, right-click on the link and select “Delete assignment” from the context menu.
Issue Buttons
Save – Press this button to save any changes for an existing issue or to add a new issue.
Cancel – Press this button to close the Issue Edit Window without saving changes or creating a new issue.
Audit – Check this box to review the annotations and measurements assigned to an issue. When this is checked, the main window will only display measurements and annotations assigned to the issue. All others will be hidden.
Assign Drawing – Press this button to assign the drawing currently displayed in the main window to the issue.
Add Activity – This button is reserved for future development.
