Extensions Overview
Extensions allow user input and calculations to be added to individual measurements. For example, a “Wall Area” extension would allow the user to enter the wall height, then calculate the wall area as the measurement length multiplied by that height. Extensions are not available in the Basic viewer. Using an extension involves the following steps:
- Use Edit Standard Extensions to create a standard extension where we define the user input and calculation fields. This feature is available for Pro-Plus and Premier users only. Dimension provides a library of pre-defined standard extensions that can be used by Pro, Pro-Plus, Advanced and Premier users.
- Use the Trace Edit Window to create a trace that uses the standard extension. The Data Type for the trace can be set to any of the extension fields.
- Assign the trace to a measurement.
- Use the Extension Measurement Values Window to fill in the extension’s user input fields for the measurement.
For Premier users, a standard extension can be specified for quantity worksheet items. Then the extension fields can be used in the quantity worksheet items in the same way that area, count, length and perimeter are used.
Let’s walk through the use of the pre-defined “Wall Area” extension.

Figure 1: Wall Area Standard Extension Definition
Figure 1 shows the Wall Area definition. The Name column shows the name of the field. This is used in formulas. The Description provides a longer description of the field. The Default/Formula column shows the Default value for user input fields or the formula for calculated fields. “WallHeight” is a user input field that has no default. “WallArea” is a calculated field that multiplies the entered WallHeight by the Length of the measurement.

Figure 2: Trace using the Wall Area Extension
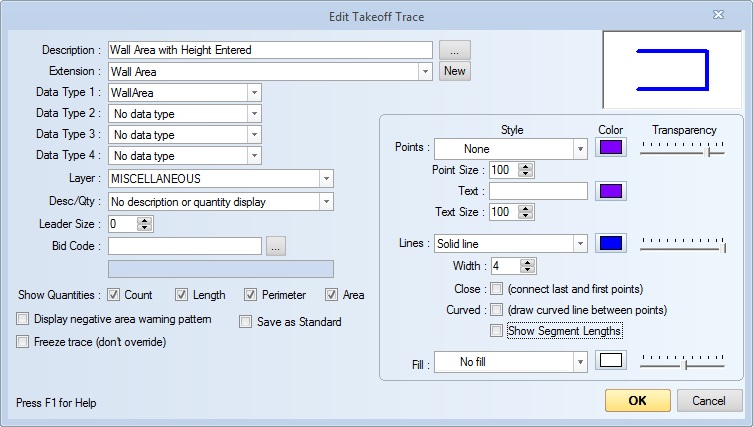
Figure 2 shows a trace that uses the Wall Area Extension. Note that the Wall Area Extension has been selected (toward the bottom of the window) and that the Data Type is the WallArea field from that extension.

Figure 3: New Measurement using Extension Trace
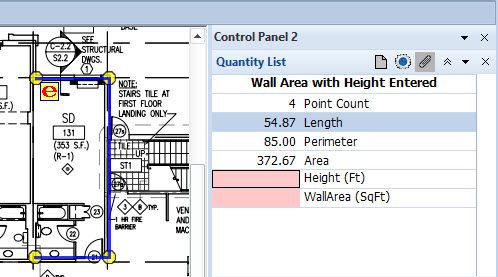
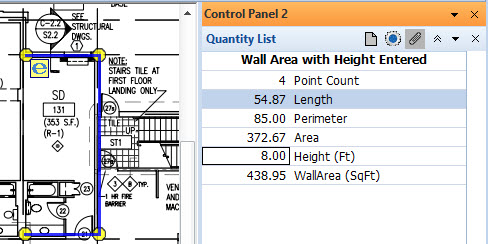
Figure 3 shows a measurement that has just been created using that trace. Note that the extension icon appears next to the first point in the measurement. The “e” in the icon is red, indicating that the extension values have not been filled in yet. Also, note that the measurement quantity list shows both Height and Wall Area as “red”. Once we enter the Height of 8.00 feet, the WallArea is calculated. After we press OK, the red “e” is gone and the extension values are shown in the Quantity List shown in figure 4.
Once we enter the WallHeight of 8.00 feet, the WallArea is calculated. After we press OK, the red “e” is gone and the extension values are shown in the measurement quantities as shown in figure 4.

Figure 4: Measurement using Extension Values Entered
Using Extensions in the Quantity Worksheet
Premier users can use extensions in the quantity worksheet. In the quantity worksheet, we can assign an extension to an item and use the extension values in item formulas. The value for the item will be the sum of the extension field values for all measurements assigned to the item. First we set up the item to use the extension as show in figure 5.

Figure 5: Quantity Worksheet Item using Extension
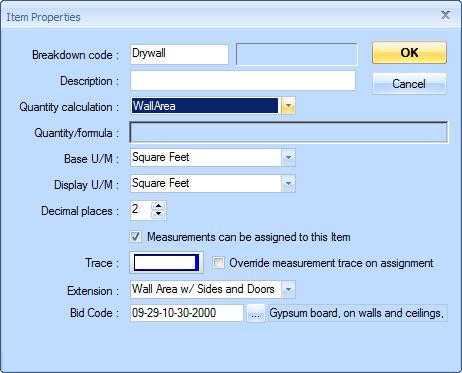
Note that the Wall Area Extension has been selected (toward the bottom of the window) and that the Quantity Calculation is the WallArea field from that extension.

Figure 6: Quantity Worksheet with Extension
Figure 6 shows a quantity worksheet item using an extension with measurements assigned to it. For the item “Drywall”, the WallArea is shown as the sum of the WallArea value for all measurements assigned to it that also use the WallArea extension.
In figure 6 the focus in on the row “DrywallUsage” so that you can see its formula in the formula bar. Note that DrywallUsage uses the WallArea quantity from the “Drywall” item just as it would use the Area, Count, Length or Perimeter.
Using Extensions requires more care than using simple measurements. Dimension includes a number of Auditing Features to help you review your project and make sure all extension values are entered and the measurements with extensions are properly assigned.
Special Extension Variable Names
There are a few extension variable names you can use to change the way measurements are displayed:
- ReplDesc – If this varable is defined for a measurement, its value will be displayed for the measurement description. The value should be text rather than numeric.
- TraceLineWidth – Let’s say you are measuring a foundation wall. You would digitize the length and have an input variable for the width of the wall. Wouldn’t it be nice to have the trace reflect that width on the drawing. To do that all you have to do is have an extension variable named TraceLineWidth. This variable should be an input or formula variable that specifies the wall width in the same units as the drawing. If you want to enter the width in inches but the drawing scale is in feet, add TraceLineWidth as a formula variable after the WallWidth input with the formula “WallWidth/12”. This will draw a fill-colored line the width of the wall (with the digitized line down the center).
- TracePointWidth and TracePointHeight – If these variables are defined, a fill-colored rectangle will be drawn around each digitized point. If only one of the variables is defined it will be used for both width and height. See the notes under TraceLineWidth about matching the drawing scale.
- TracePointRadius – If this variable is defined, a fill-colored circle will be drawn around each digitized point. See the notes under TraceLineWidth about matching the drawing scale.
Note: If you use any of the Trace… variables above, make sure the trace fill color isn’t white.
There are a few measurement variables that may be useful for extension calculations:
- GroupCount – The total of the number of groups of disconnected points in the measurement. If points 1 to 7 were a group, points 7 and 8 were disconnected and points from 8 onward were a group, GroupCount would be 2.
- SegmentLen1 – The distance from point 1 to point 2 for the measurement.
- SegmentLen2 – The distance from point 2 to point 3 for the measurement.
- UncountedPts – The number of uncounted points in the measurement.