
Standards Security Overview
Some organizations need to limits standards changes to select personnel then distribute the changes to other personnel. Standards in this case means standard Traces, Scales, Extensions, Bid Codes, Layers, Point Symbols and Work Breakdown Categories. This is done using Standards Security.
This is for standards only. Project-specific information is NOT protected. For example, any user could change drawing scales or measurement traces.
In this document, the term "Administrator" refers to a person who can change standards. "Non-Admin" refers to someone who is prevented from changing them.
Protection Implementation
The sections below describe how Different standards maintenance would work for Non-Admins when the standard is protected.
Traces
In the Standard Trace List and Tree windows, the options to add and delete traces would be disabled. The "Grid Edit" button would also be disabled. Edit would be enabled so that user could review the details of traces in the Standard Trace Edit Window. But the "OK" button would be disabled so that the user couldn't make changes.
Scales
In the Standard Scale List Window, the Add and Delete buttons would be disabled. Edit would be enabled so that user could review the details of scales in the Standard Scale Edit Window. But the "OK" button would be disabled so that the user couldn't make changes.
Extensions
In the Standard Extension List Window, the Add, Clone and Delete buttons would be disabled. Edit would be enabled so that user could review the details of extensions in the Edit Standard Formula Extension Window. But the "OK" button would be disabled so that the user couldn't make changes.
Bid Codes
In the Standard Bid Code List Window, the Add, Delete and Paste buttons would be disabled. Edit would be enabled so that user could review the details of bid codes in the Bid Code Properties Window. But the "OK" button would be disabled so that the user couldn't make changes.
Layers
In the Edit Layers for Drawing Window, the Add, Edit and Delete buttons would be disabled. The user could still change the settings for layers in the current drawing.
Point Symbols
In the Point Symbol List Window, the Drag New, Clone and Delete buttons would be disabled. Edit would be enabled so that user could review the details of point symbols in the Point Symbol Edit Window. But the "Save" button would be disabled so that the user couldn't make changes.
Work Breakdown Categories
In the Work Breakdown Categories Window, the New and Delete buttons would be disabled. All of the checkboxes WOULD be enabled except the "Lock" checkbox. Edit would be enabled so that user could review the details of categories in the Work Breakdown Categories Window. But the "OK" button would be disabled so that the user couldn't make changes.
Enabling Security and Being an Administrator
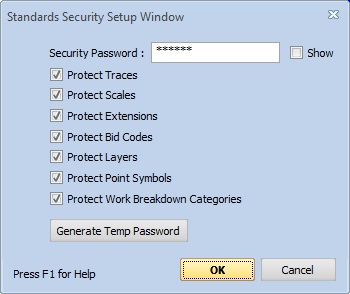
Standards Security Setup Window
As initially installed, Dimension does not enable security. Follow the steps below to enable security and become an administrator.
- From the Ribbon Bar File tab, select "Administration/Standards Security Setup...".. The Standards Security Setup Window will be displayed.
- Enter a password, check the standards you want to protect and press OK. Record the password somewhere! Someday you'll move to another computer and will need to re-enter it. Your standards are now protected but your computer is set up as an administrator so they aren't protected against you.
Enabling Security and Being an Administrator
Standards Export and Import
Once you have enabled the security, the protections will be in place for all other users who share your database. But in some cases you may need to enable the security for another database. This is done using the standards export/import capability.
When exporting standards, if security is in place, an additional export option will appear to export the security settings (Standards Security Setup). If this is checked, the security setting will be included in the export file. You can export standards (traces, scales, etc.) at the same time you are exporting the security setup.
When importing standards, the securing settings are imported automatically, there is no option to exclude them. Notice in the screen shot below that it has a checked checkbox with a gray background. This means it is selected and can't be un-selected
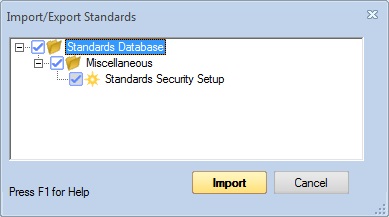
Standards Security Setup Import
Note: The security information is imported but the security password is NOT. So the importing user will be a Non-Admin.
Temporarily Disabling Protection for a Non-Administrator
Occasionally a Non-Admin may need to temporarily be able to make changes to standards. This procedure lets the administrator give them a password that will work only for the day it is created.
- From the Ribbon Bar File tab, the Administrator selects "Administration/Standards Security Setup...".. The Standards Security Setup Window will be displayed.
- Press the Generate Temp Password button. You will see a dialog similar to this:
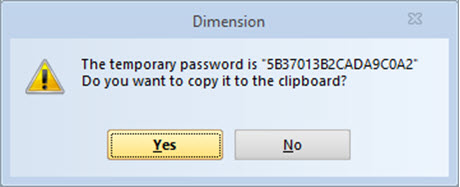
- Press "Yes" to copy it to the clipboard.
- Paste the password into an email and send it to the non-administrator.
- When the Non-Admin receives the password, they should select
"Administration/Standards Security Setup."
from the Ribbon Bar. They will be asked for a password.
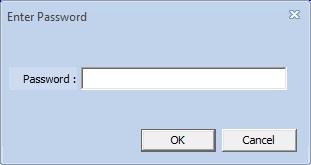
- They should copy and paste the password from the email then press OK. The setup dialog will NOT be displayed. The security is now disabled for the rest of the day.
Recovering a Forgotten Administration Password
If you forget your administrator password, eTakeoff can give you a temporary password that will let you into the Standards Security Setup Window to see your administrator password.
- In Dimension, from the ribbon bar File tab, select "Administration/Install Software License" and write down your Site ID.
- Send an email to support@etakeoff.com with your name, company name and the Site ID. eTakeoff support will reply to your email with a temporary password.
- Select "Administration/Standards Security Setup...". from the File tab of the Ribbon Bar.
- You will be prompted for a password. Copy the temporary password from the support email, paste it into the password dialog and press OK.
- When the Setup Dialog is displayed, check the Show box and you can see your forgotten password. Write it down somewhere!
- Press OK in the setup dialog and your original password will be restored.